
Atelier Ryza: Ever Darkness & the Secret Hideout DX Guide | How To Craft The Best Items
Master synthesis in Atelier Ryza: Ever Darkness & the Secret Hideout DX and learn how to create strong bombs, healing items, and more with the materials you already have.
Game Guide by Faviyan Mustafiz on Nov 15, 2025
Crafting in Atelier Ryza can feel confusing at first. The in-game synthesis tutorials throw a lot of information at you, and it is easy to lose track of what actually matters when making an item.
If you only want a quick way to keep adventuring, you can always rely on the game’s Auto-Add Materials function so synthesis does not slow you down. However, understanding how synthesis really works lets you craft much better items and gives you far more control over your build.
This guide breaks down the synthesis screen step by step. It explains how Quality, Effects, Traits, and Material Loops work so you can craft high-quality items like Explosive Uni and Grass Beans with confidence. Sentences are kept simple and clear, so you can easily follow along while you are at the cauldron in game.
Understanding Synthesis And Item Quality

The basic goal of synthesis in Atelier Ryza is to create the highest Quality items possible with the materials you currently have. Quality is the key stat to focus on while crafting. When you make an item at different Quality levels, the higher Quality version will always have higher potency in battle or healing.
For example, a high-Quality Explosive Uni bomb will deal more damage than a low-Quality one. In the same way, a high-Quality Grass Beans healing item will restore more HP than a lower Quality version. Thinking about Quality this way makes it easier to see why good materials and careful synthesis matter so much.
Whenever you are deciding what to craft next, remember this simple rule: better Quality means stronger items, whether they deal damage, heal, or provide some other effect.
Using The Table Of Contents Before You Craft
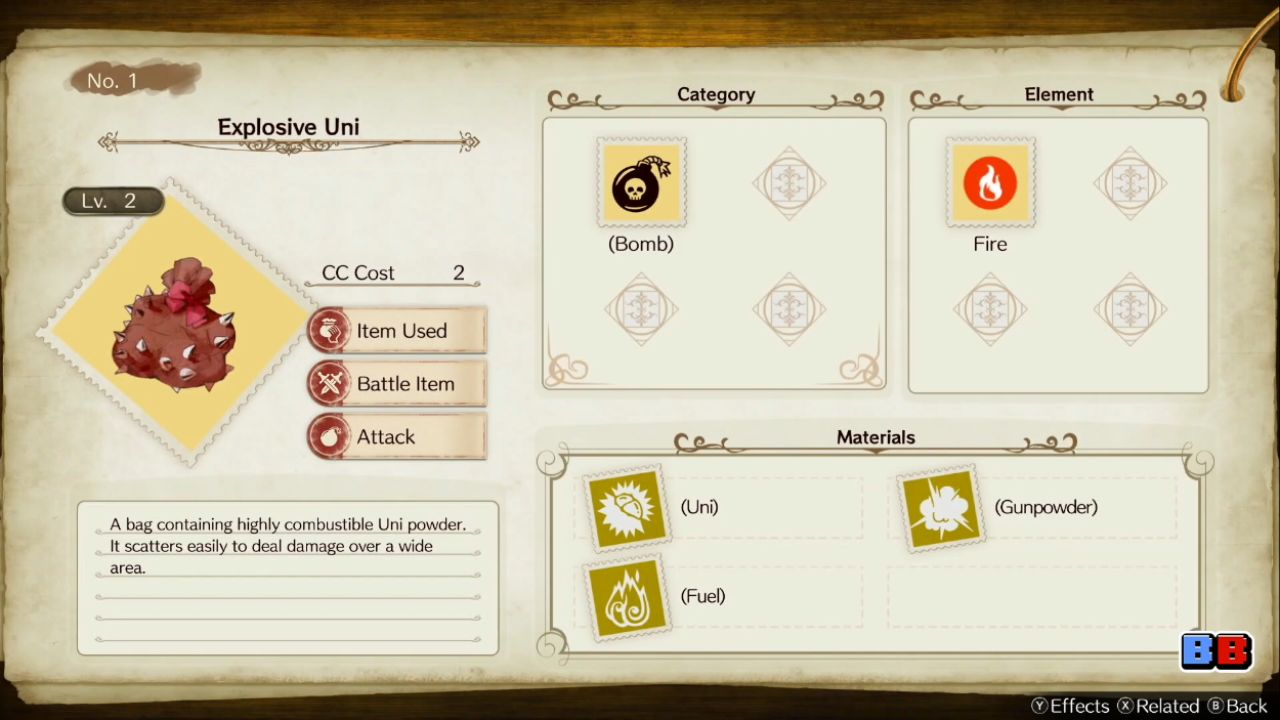
When choosing an item to synthesize, you can highlight that item on the recipe list and open the Table Of Contents. This screen gives you more detailed information before you even start putting in materials.
From the Table Of Contents, you can see related topics connected to the item you want to make. Selecting the item entry here shows important details such as its category, Core Charge cost, and any extra materials you might need for certain parts of the recipe. This information helps you plan ahead so you do not waste rare ingredients.
Sometimes this page will look almost empty. When that happens, it usually means the required material has not been gathered yet or the item has never been crafted before. In that case, you need to either obtain that material in the field or craft the item at least once to unlock more information on the page.
From this same screen, you can also see a list of possible Effects the item can get during synthesis. Effects change how the item behaves in battle or when used, and they are an important part of building strong gear and usable items. If you ever forget what an Effect does, you can check it again while you are in the middle of synthesizing.
Every recipe also requires a starting material. This is shown at the top of the recipe display on the right side of the synthesis screen. Materials listed below that starting material are other ingredients you should consider adding if you want to unlock Effects or Trait slots later in the recipe.
Quick Recap: What Matters Before Synthesis Starts
Before actually placing any materials into the cauldron, it helps to recap the essentials. The aim of synthesis is to use the materials you have to create items with as high a Quality as possible. Quality directly affects the potency of damage, healing, or other item effects.
At every stage, the Table Of Contents can be used as a reference to see all the information you need about the recipe. If the pages look empty, you likely need to gather the required materials or craft the item once to unlock that data. Finally, you always need at least one material from the category shown on the right-hand display to begin the recipe at all.
Starting An Explosive Uni Recipe And Understanding Choose Quantity
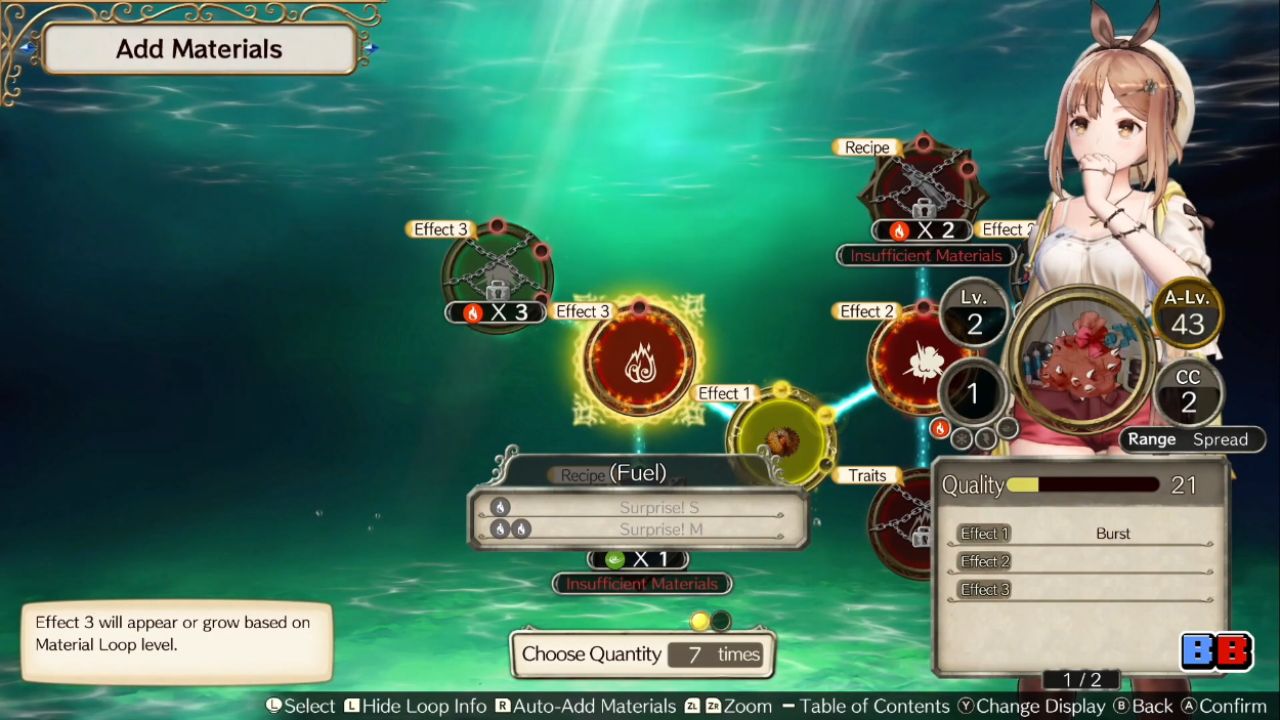
To see how all of this comes together, consider crafting an Explosive Uni. When you open this recipe, you will notice a Choose Quantity number at the bottom of the screen, with several orbs displayed above it.
Those orbs show the minimum number of materials needed to start synthesis. Choose Quantity can be a little confusing at first. It is a counter that tracks how many materials you can still use in this recipe before the game forces you to finish the item. In other words, it acts as a limit on how many Material Loops you can unlock in one synthesis attempt.
If you spend all of your allowed materials, you will have to complete the item with whatever you have already put in. Keeping an eye on Choose Quantity helps you avoid running out of materials before unlocking everything you want in the recipe.
What Material Loops Are And Why They Matter
On the recipe screen, every node or shape you see is called a Material Loop. The first one in the chain is where you begin. When you look at this first Material Loop, you will see a list of Effects below it with colored orbs next to each Effect. This first loop is often labeled Effect 1.
As mentioned earlier, Effects change how your final item behaves. The colored orbs next to those Effects show how much elemental potency is required to unlock each one. For example, a Material Loop might need 3 units of lightning element to unlock the Scatter Effect, and then another 5 lightning to unlock Explosive, for a total of 8 lightning.
The game can make it look like unlocking these Effects is mandatory, but it actually is not. If you just want to move deeper into the recipe and unlock other Material Loops, you only need to place a material into the loop. The element does not have to match what the loop is asking for if your only goal is to advance along the path.
However, since you are already using materials anyway, it usually makes sense to try to unlock at least one Effect when you can. This makes each synthesis attempt more rewarding.
Reading Elements, Potency, And Material Info
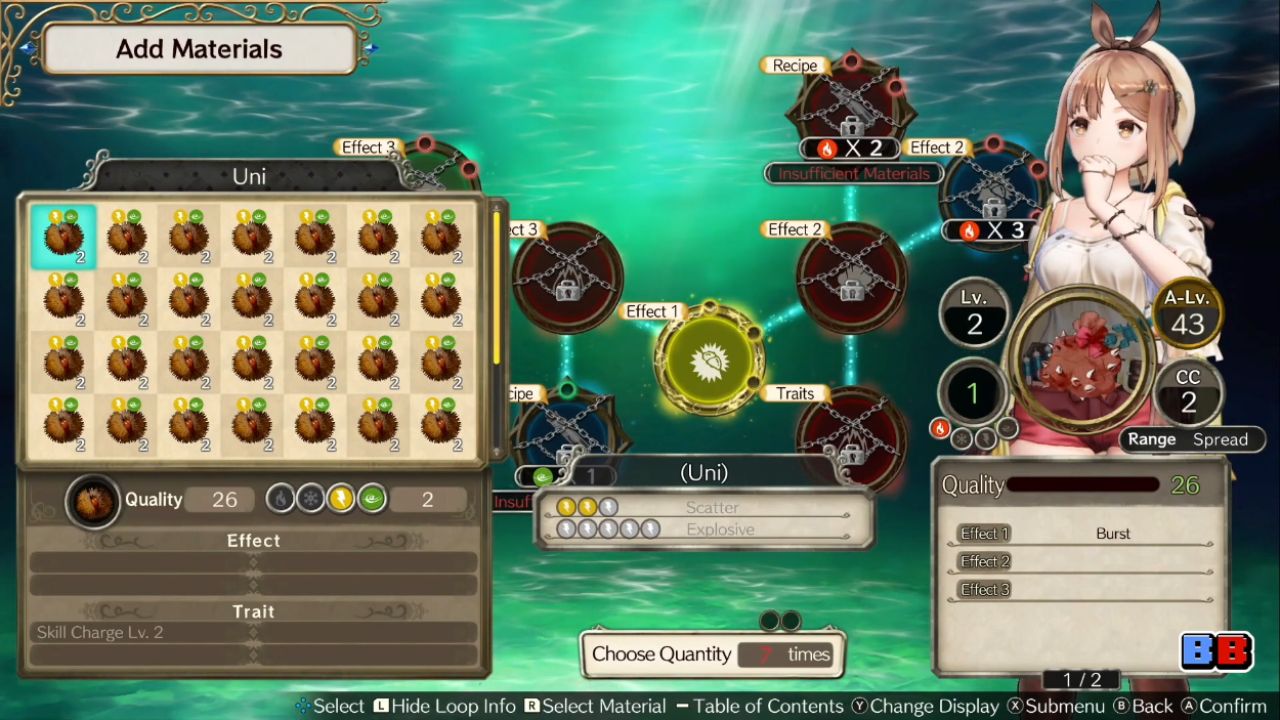
When you start selecting materials for a Material Loop, each material will show numbers and colored orbs above its icon. The numbers represent that material’s elemental potency. These values are also displayed in more detail in the information window below.
Each colored orb indicates an element, such as fire, lightning, or wind. If a material has more than one colored orb, it means that material carries multiple elements, each with the same potency value shown above.
To unlock an Effect on a Material Loop, you must match the required element and reach the total elemental potency that the Effect demands. For instance, to unlock Scatter, the loop might require a total of 3 lightning potency.
That requirement could be met with three materials that each provide 1 lightning, or two materials that each provide 2 lightning. As long as the sum is 3 or higher, the Effect will unlock.
While doing this, it is also important to watch Quality. Quality still controls how strong the final item will be. To prioritize better materials quickly, you can open the Submenu, choose Sort, and then sort by Quality. This puts the highest Quality materials at the top of the list, making it easier to pick the best ones.
The bottom display shows all the important information about whichever material is currently highlighted. You can see its Quality value, its elements and their potency, as well as any Effects and Traits that material carries. This screen is where you confirm whether a material is truly worth using in the recipe.
How Traits Work And The Trait Material Loop
Traits are another way to change how an item behaves. They are separate from Effects and can be passed from one item to another through synthesis. Only three Traits can be selected for any single item, so choosing them carefully is important.
By default, Traits added to the item during synthesis appear as locked on the finished product. A small lock icon indicates this. A locked Trait can still be passed on to other recipes later, but the current item will not actually benefit from its effect until the Trait slot is unlocked.
To unlock these Trait slots, the recipe includes a special Trait Material Loop somewhere in the network of loops. Reaching it requires moving through other loops and placing the right materials along the way.
Once you reach the Trait Material Loop, you need to supply materials with the required elemental potency to open each Trait slot. When these slots are unlocked, the Traits you choose at the end of synthesis become active on the final item.
Recap: Using Material Loops, Effects, Quality, And Traits Together
To bring these ideas together, remember that Material Loops are the shapes forming the recipe path. To start any recipe, you must choose a material for the first loop that matches the category shown on the right side of the screen. If you want to unlock Effects on that loop, you must feed it materials whose total elemental potency meets the requirement for each Effect.
Quality should stay in focus as you pick materials, since higher Quality makes the final item stronger. Sorting by Quality while selecting materials lets you target your best ingredients without scrolling through everything manually.
Finally, Traits act as special properties that can move from one item to another. To actually use a Trait on the current item, you need to unlock its slot by reaching and completing the Trait Material Loop with the proper elements and potency.
Unlocking Adjacent Material Loops
Once you place a material into the first Material Loop, the loops connected to it become important. These nearby loops often start out locked and show a small icon with an element and a number.
This icon tells you what element and elemental potency you must provide in the current loop to unlock the next one. For example, a loop to the left might require 3 fire, while a loop below might require 1 wind. If the materials you put into the current loop provide enough fire or wind potency, the corresponding adjacent loop will open.
This is where materials with multiple elements become very useful. A single ingredient might provide both fire and wind at the same potency, allowing you to unlock different paths through the recipe from a single loop. Planning which loops to open in what order lets you reach important spots like Trait Material Loops or extra Effect loops without wasting materials.
The exact combination of Effects, Traits, and other bonuses you want to add is entirely up to you. Just remember that you only need the minimum number of materials indicated by the orbs above Choose Quantity to start synthesis at any time. Using more materials gives you more room to unlock loops, but it also uses up that Choose Quantity limit.
Finalizing Synthesis And Choosing Traits
After you have placed enough materials and are ready to finish, the game moves to the last part of synthesis. At this stage, you select up to three Traits to pass on to the item. All of these Traits come from the materials you used while filling the Material Loops.
You can highlight each Trait and decide which ones match the role you want the item to fill. Once you have chosen up to three, confirm your selection and accept the synthesis with OK. The game then creates your new item using the Quality, Effects, and Traits you built up throughout the recipe.
Your item is now complete and ready to be used or equipped. By understanding Quality, Material Loops, Effects, Traits, and how to move through a recipe efficiently, you can repeatedly craft stronger versions of items like Explosive Uni and Grass Beans, improving your performance throughout Atelier Ryza: Ever Darkness & the Secret Hideout DX.
Also, check our other guides below:
Contributor, NoobFeed
Latest Articles
No Data.