
No Rest for the Wicked Guide | How to Complete Weeping Sisters
Here's a guide on how to complete Weeping Sisters in No Rest for the Wicked.
Game Guide by Mash Rahman on Jun 09, 2026
No Rest for the Wicked continues to be a mesmerising experience for players, with its bleak worldview and highly deliberate structural pacing. Having survived the horrors of the Black Trench and completed your tasks for the holy Inquisition, a new political crisis is brewing in the capital city. Head straight for the heavily guarded War Room in the city of Sacrament. See Governor Ellsworth and rebel leader Odessa have a tense conversation during the cinematic.
After the cinematic sequences end, move directly to the governor to deliver a mysterious, unsigned piece of correspondence. This all-important interaction launches the sprawling post-game side quest known island-wide as The Weeping Sisters. Ellsworth reads the unsettling contents of the note and at once requires your tactical assistance at an ancient landmark deep in the southwestern territory.
If you want to follow his military entourage, you must go out of the main stone gates of the capital and turn immediately towards the western cliffsides. You will know your vanguard is moving in the right direction when the bleak, rocky landscape turns into vibrant fields covered with golden sunflowers. This aesthetic transition is your official entry into the Lowland Meadows, a beautiful, yet incredibly hazardous region filled with infected wildlife and hidden treasures.
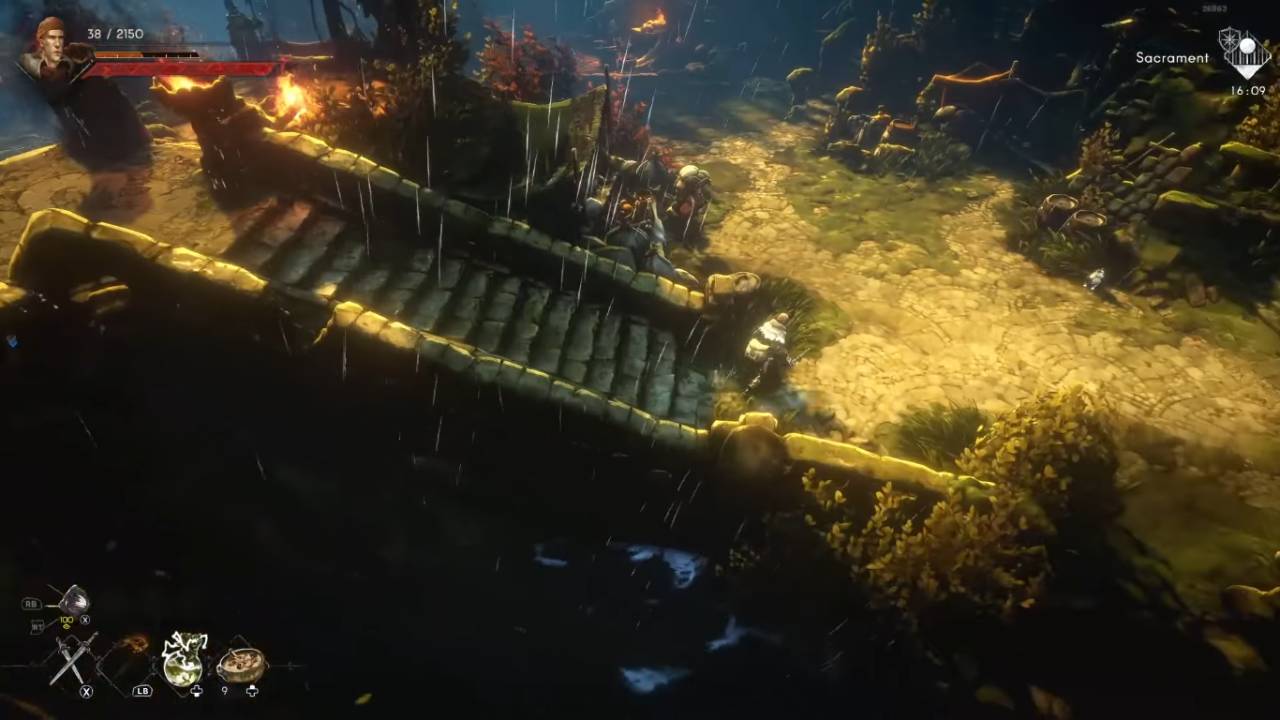
Meet the Valley Bridge Flooded Road Block
Your main goal is to establish a safe operational foothold as you move further into the sunflower-strewn fields of the Lowland Meadows. Take the winding dirt paths until you come to the main blue Whisper terminal in the region, glowing against the rock face. By flipping this magical checkpoint it guarantees that any unexpected combat failures further down the line won’t mean a massive loss of exploration momentum.
From this saving terminal, head down the muddy main path towards the southeast quadrant of your directional map interface. Finally, you'll find Governor Ellsworth and his own trusted captain Winnick atop a large reinforced wooden bridge. The generals appear to be in utter despair, as a massive flood of foul, pestilential water has totally submerged the principal canyon way forward.
Talk at length with the stranded men to learn about the environmental threats to their continuing investigation. The contaminated water is flowing from a massive structural reservoir, controlled by rival raider factions to the west, Ellsworth says. He urges you to go out to the wild marshlands to the east and find the native hunters, who might have the specialized knowledge to drain the channels.
Gear and Stats Optimization for Lowland Exploration
You’ll want to tweak your active character build before diving headlong into the damp marshes of the Lowland Meadows. The wild life and plague-mutated soldiers in this area are very aggressive and their unblockable attacks deal great physical and poise damage. Heavy or medium armor setups with a good weight balance will prevent your character from being knocked down all the time.
Make sure your equipped rings have secondary passive bonuses such as increased poison resistance or faster stamina regeneration rates. A quick stamina recovery speed allows you to roll through the toxic bogs one after the other without depleting your blue gauge. Consider also adding electricity or fire damage gems to your main weapon via the enchanter at the capital to give you the maximum offensive potential against flesh-based enemies.
Locating the Hunters and Scouting the Eastern Swamps
Now with your new goal in mind, turn your back on the flooded valley bridge and start a careful trek into the misty eastern wetlands. This particular stretch of Lowland Meadows is very dangerous because of the shallow pools of glowing green toxic muck. You will have to precisely jump between dry land to avoid being inflicted with a poisonous status effect that quickly kills you.
Take your time exploring the swampy landscape and the small cave systems scattered across the northern cliff walls. Break open the rotting wooden crates hidden in these dark alcoves and diligent scavengers will be rewarded with rare crafting ores and weapon upgrade components. Approaching a major crossroads, you see a small flickering bonfire. A short cinematic plays out, showing the fleeting shadow of a monstrous creature leaping across the high ridges.
Do not give in to the temptation to go after the mysterious being right away, and instead take the rocky ledges that slope downwards toward the damp riverbed. A natural rock clearing in the rushing water leads to a large, well-fortified hunter's camp. Find the exhausted survivalists lying near the main roasting spit and speak to their scout leader, a competent female named Lara.
Breaching the Deadly Deserted Savor Den
Speak to Lara at length about the logistical nightmare that has the governor’s detachment trapped at the flooded canyon bridge. She listens carefully and confirms that the devastating floods are coming directly from the automated locks inside a nearby lumber facility, the Abandoned Savor Den. Lara agrees to help your cause, telling you to close behind her as she leads you up a secret path in the mountains, to the western ridges.
Lara reaches the old logging facility, its exterior of wood heavily fortified, and with a special key mechanism opens a huge mechanical elevator lift. She issues a stern warning about the mutated horrors and hostile renegades who have made the abandoned buildings their permanent base of operations. Take the wooden lift platform up to the higher levels of the lookout tower by pulling the main iron lever.
The moment the elevator arrives at the floor, an aggressive guard in armor will immediately rush your position with a raised battleaxe. Parry his opening blow with a well-timed parry or a quick directional roll and punish him with the special runic powers of your weapon. Once the first threat is permanently dealt with, use your weapon to smash a grouping of loose wooden planks over a hidden crawlspace on the right side of the main staircase.
Den Rooftop Navigation: Take a bite of the view
Breaking the boards of the defensive boards reveals an ancient iron ladder that leads straight up into the structural rafters of the high watchtower. Make your way up to the tallest part of the building and gingerly climb through a shattered window frame onto the slippery roofs of tile beneath. Walk precisely along the narrow wooden supports, watching carefully for the rare Boar Tusk material item on a ledge in the distance.
.jpg)
Turn and run, leaping onto the roof of the closest wooden hut, which is mounted on a row of defensive iron spikes. Drop down carefully into a small gap in between the spikes to sneak into the interior of the locked residential quarters. To the right of the chamber, traverse the raised wooden walkways and leap over an open chasm to engage with a heavy chain mechanism.
When you pull this chain, a giant wooden drawbridge will instantly drop down, which is a permanent shortcut back to the main Whisper terminal. This is a great shortcut to quickly re-stock on your healing items at a campfire without having to go back across the rooftops. Exit the residential hut and enter the expansive lower courtyard, to confront a sizeable assembly of hostile raiders patrolling the central steps.
Raider Fortress Enclaves Combat Strategies
The Abandoned Savor Den's inner courtyards are teeming with organized raider squads that employ very coordinated group tactics. Shield-bearing brutes will attempt to corner you against the environmental walls and nimble archers will shoot fire-tipped arrows from elevated platforms. To survive these chaotic skirmishes you need to focus on crowd control, starting by systematically picking off the ranged attackers.
Use the cheap runic abilities of your weapon to break the guard of enemies with shields and put them in a staggered position where you can damage them. Don’t underestimate the usefulness of environmental hazards. Kicking enemies off the high wooden platforms is an instant kill victory. Always be aware of your surroundings, as you don't want to be ambushed by patrol groups wandering the lower corridors.
How the Windmill Works and How to Get to the Security Door
Carefully clear out the courtyard guards then ascend the stone stairs to a cluster of decaying ancient ruins concealed behind the secondary tower. Find a thick cluster of green vines on the back wall and climb them to discover a hidden treasure chest with high tier armor pieces. Head back out on the main trail and carefully leap down from the ledge of a broken wooden windmill into a small storage yard enclosed by a fence.
This isolated area is filled to the brim with breakable clay barrels that leak a strange glowing green chemical fluid when broken. To get into the facility, you have to climb a couple of consecutive iron ladders to a high-altitude wooden platform overlooking the entire valley. To cross a large open gap from this high place you will need to use the rotating panels of a nearby windmill structure as a makeshift bridge.
When the large wooden blades line up perfectly, do a series of quick running jumps to make it to the other side of the cliffside walkway. Walk carefully along a narrow wooden beam, climb down to a lower level of metal scaffolding to find a heavy iron security switch. Use all your strength to lift this lever to raise the huge iron gate that previously blocked access to the facility's main aquatic control chambers.
Back to the valley and opening the floodgates
Now that the inner security gate has been bypassed, hurry up a steep wooden ramp on the extreme rear of the industrial complex. Carefully descend onto a set of suspended wooden planks directly above a massive, churning body of trapped water. Go to the main mechanical console located in the center of the platform and pull the main drainage lever to open the main floodgates.
A dramatic in-game cinematic will be played showing the massive reservoir gates sliding open to completely drain out the putrid water out of the canyon below. With the way to the Weeping Sisters finally clear, double back through the facility and head straight for the first wooden bridge. When you arrive, you find that Governor Ellsworth and Captain Winnick are no longer at the location.
Instead you'll see a single hunter named Adan standing by the railing, seemingly in a state of complete panic. Adan, out of breath, says that the two military men heard horrible screams for help coming from the direction of the eastern base camp, and they ran to investigate. Run back on the muddy main road to catch up with the detachment, where you'll find them arguing with surviving scouts about Lara's sudden disappearance.
Searching Devastated Campsite and Hunting the Beast
Rush back to the main eastern campsite to find that the once-peaceful haven has been totally decimated into smoking, blood-stained wreckage. The tents have been torn to shreds, and a new blue Whisper terminal has been placed in the middle of the carnage to memorialize the tragedy. Go ahead and activate this new saving point and fill your hotbar with your most potent restorative meals, because you have a catastrophic confrontation ahead of you.
Follow the newly exposed, muddy river bed, once covered by the putrid waters of the reservoir. There’s a chilling cinematic moment as you run down the slick stone banks to unveil a huge, plague-ridden monstrosity bursting from the foggy reeds. The hideous creature screams in complete agony, exposing a twisted combination of human flesh and a monstrous feral bear.
The game’s UI refers to this terrifying creature as The Lost Huntress, and she is the primary boss fight of the Lowland Meadows. The battle begins straight away at the center of the shallow riverbed, so you have to dodge right away a high-speed sweeping claw attack. This encounter will test your mechanical patience to the limit, as the beast can crush your armour plating in a single continuous combo.
Beaten: Savage Assault Of The Lost Huntress
The Lost Huntress is a creature of aggressive, forward-charging lunges and devastating ground slams that send ripples of shockwaves across the water. Don't panic-roll backwards, since she will easily catch you at the end of your animation using her massive attack range. Instead, time your directional dodges so you roll right under her outstretched arms, putting your character safely behind her exposed side.
.jpg)
At the end of a heavy running lunge she will pause for a moment to regain her breath from the great physical effort. This short period of fatigue is your main window of attack, where you can get in two or three heavy melee attacks and get out. If you can fill a full focus meter, immediately use your weapon’s highest-tier runic arts to inflict massive stagger damage.
Once her health pool hits below the half way mark, the beast enters into a pure frenzy and starts chaining unpredictable spinning slashes. Keep your mechanical discipline by popping healing potions from your hotbar when your vitality drops into the danger zone. Use this methodical hit-and-run tactic until the tragic creature finally drops into the muddy riverbed and you can reward your victory with False Noble Gauntlets and a precious Plague Ichor.
The Secret of the Weeping Sisters Cave Revealed
Once the corrupted huntress is finally laid to rest, find a narrow rocky path that leads to the upper right corner of the flooded arena. Follow this mountain trail to the last blue Whisper checkpoint, which is inside a row of ancient stone pillars. Drop down carefully to a lower dirt track, and make a series of well-timed jumps across a cluster of mossy stone structures near a small campfire.
Sitting right by this flickering bonfire is the secret entrance to a huge dark cave network known to the local citizens as the Weeping Sisters. Carefully enter the vast depths to unleash the dramatic final cinematic sequence of this long post-game assignment. You will find Governor Ellsworth and Captain Winnick in the middle of a secret ritual chamber, standing before the enigmatic Baurus.
Baurus drops a massive narrative bombshell, informing the governor that the beloved brother of his, King Harol, was brutally murdered in the capital. He does issue a stern, desperate warning to distrust completely the acts and holy motives of Madrigal Seline and her fanatical Inquisition forces. The game interface will officially let you know that the Weeping Sisters quest is fully complete as the cinematic fades to black on this massive cliffhanger.
Also, check our No Rest for the Wicked Review and other guides below:
Editor, NoobFeed
Latest Articles
No Data.