

The Outlast Trials Guide | Know Your Enemies
A guide on description of all enemies in The Outlast Trials.
Game Guide by Groot on Oct 30, 2025
You will face different types of enemies in The Outlast Trials. These are called Ex-Pops, and their job is to test your survival skills and awareness. These enemies show up on different maps, and each one has its own traits, habits, and flaws.
Figuring out their habits will help you stay calm, avoid arguments, and reach your goals more quickly. This guide outlines every enemy you will encounter and how to deal with them during your trials.
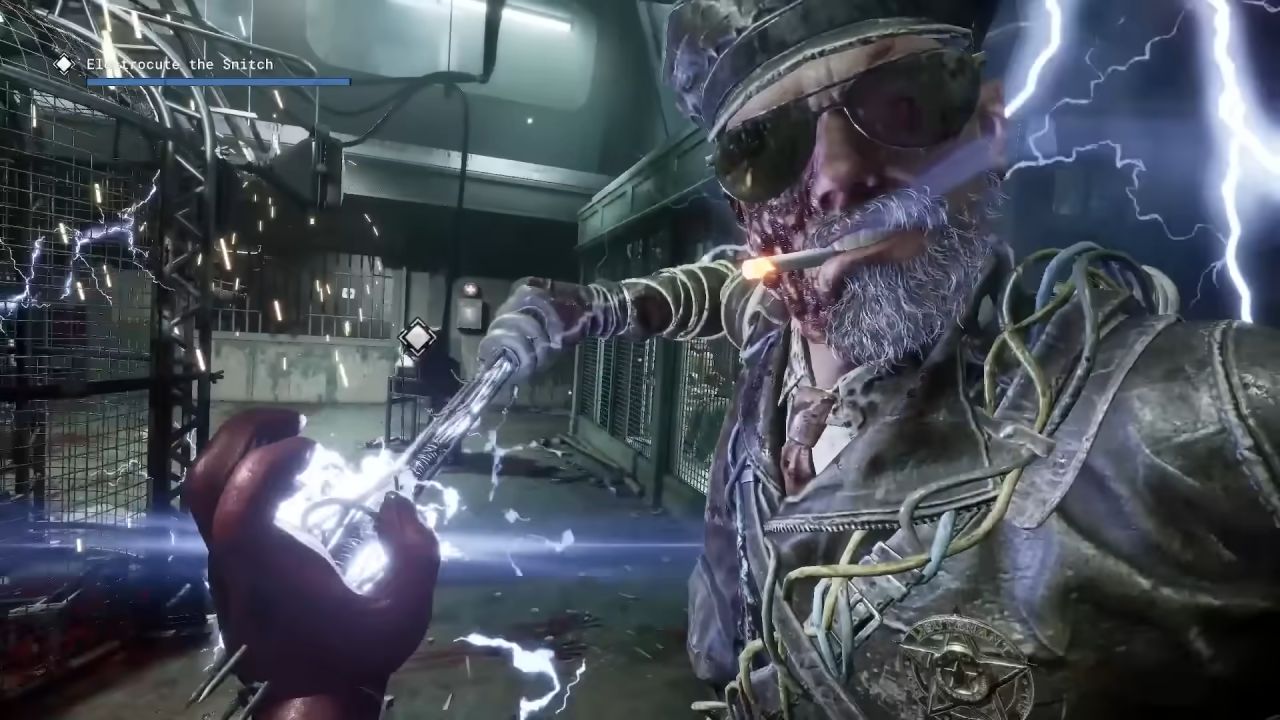
Leland Coyle
You will encounter Leland Coyle in the Police Station map. Once a police officer, he now carries a shock baton and enforces his distorted version of justice. Coyle often patrols near objectives, pursuing Reagents he spots and using his baton to inflict significant harm.
He can grab standing Reagents to deal heavy damage and execute downed ones waiting to be revived.
To detect Coyle, watch for the blue light from his baton and listen to his loud grunts. If he spots you, vault over nearby barriers, lock doors behind you, and use hiding spots to break his line of sight. If Coyle is guarding an essential area, coordinate with your team by having one member lure him away so the rest can complete the task safely.
Mother Gooseberry
You will find Mother Gooseberry in the Tutorial, Orphanage, and Amusement Park maps. She carries a duck puppet named Daddy, which has a drill in its mouth. She believes she must protect her “children” and attacks any Reagent she sees. She moves quickly, often guarding objectives, and can grab or execute players.

You can hear her nearby through her conversations with Daddy, which gives you time to hide. Use the Kick to Help and Livesaver Prescriptions to rescue teammates she captures. When pursued, create distance by vaulting over obstacles, shutting and locking doors, and throwing projectiles at her. If she’s blocking progress, have a teammate distract her while others complete the goal.
The Skinner Man
When your mental meter is totally empty, The Skinner Man shows up. It looks like a skewed version of Doctor Easterman and follows you around until you get your mind back. It can't hit directly, but if you stand too close, it does damage over time. Only you can see it, as it is a hallucination, and it vanishes once your sanity returns.
To handle the Skinner Man, keep moving. Running allows your sanity to restore naturally, whereas stopping increases risk. You can also use an antidote to recover sanity instantly. The figure may appear when your sanity is low, serving as an early warning before the true threat manifests.

Grunt
The Grunt is the most common Ex-Pop and can be found across all maps. They attack on sight and are often seen around objectives. While not strong, they can be a nuisance if ignored.
To evade them, use hiding spots such as lockers or barrels, or strike them with bricks, bottles, or the stun RIG. They are easier to lose in the dark—crouch and stay still until they pass. Keeping your distance prevents unnecessary health loss.
Large Grunts
Large Grunts are like regular Grunts, but they move more slowly and are stronger. They can do a lot of damage if they catch you, and they roam all maps.
Stay away from close fighting and keep moving to keep your space. You can stun them with things you can throw at them or distract them from your goals. If one is blocking your progress, lead it down a long path, then circle back to complete your task.
Berserker
The Berserker is a blind variant of the Large Grunt. It attacks if it hears you but can be avoided through stealth.
To avoid being detected, crouch and move slowly. Avoid noise traps, broken glass, or any sound-producing obstacles. Though manageable alone, the Berserker becomes more dangerous when combined with other Ex-Pops, so move carefully through its area.
-0-24-screenshot.jpg)
Night Vision Grunt
The Night Vision Grunt functions similarly to a standard Grunt but is equipped with night vision goggles. This enemy can see in darkness, removing the advantage of hiding in unlit areas.
To counter it, lure it into bright spaces where its goggles lose effectiveness. The light blinds the Night Vision Grunt, giving you a chance to escape or hide.
Pusher
The Pusher emerges from white shutters around the map and doesn’t deal physical damage. Instead, it sprays a hallucinogenic gas that drains your sanity and summons the Skinner Man.
When you hear shutters open or a voice muttering nearby, stay alert—this signals the Pusher’s presence. If spotted, throw an object to stun it and escape. The Pusher doesn’t chase for long, so breaking contact quickly is effective.
Pouncer
Pouncers hide inside lockers, barrels, and under beds, waiting to ambush nearby Reagents. When you pass a hiding spot containing one, it attacks and forces you to struggle free.
To avoid being caught, listen for sounds such as doors closing or heavy breathing coming from hiding spots. If you are grabbed, use the Self Defense Technique Prescription with a brick or bottle in your inventory to escape quickly. Always stay alert in unsearched rooms.
Imposter
Imposters appear in multiplayer sessions and mimic your teammates’ appearance. They approach players, stab them, and then retreat.
You can identify an Imposter by observing the name tag—it appears misspelled or glitchy. They also walk directly toward you while breathing heavily and holding a knife. When you recognize one, back away and wait for it to leave. Imposters don’t chase far but can surprise you if you linger.
Screamer
The Screamer acts more like a trap than a traditional enemy. It stands still with a battery pack on its chest. When a player approaches, it emits a high-pitched scream that freezes nearby Reagents and attracts other enemies.
When you hear a Screamer grunt, crouch down and move slowly to avoid setting it off. You can walk in front of it as long as you stay far enough away that it doesn't get scared. When it screams, it moves to a new spot and waits for the next person who isn't paying attention. Being careful stops encounters from happening again.
By understanding how each Ex-Pop operates, you can adapt your movements, manage your resources, and survive each trial with better awareness. Each enemy in The Outlast Trials demands careful observation and quick decisions to avoid capture and complete your objectives successfully.
Also, check our The Outlast Trials Review and other guides below:
- The Outlast Trials | Beginner's Guide
- The Outlast Trials Guide | How to Unlock the Hidden GOLDEN E.S.O.P.
- The Outlast Trials Guide | How to Complete the Main Mission in Police Station
- The Outlast Trials Guide | How to Complete the MK Challenge 1 in Police Station
- The Outlast Trials Guide | How to Complete the MK Challenge 2 in Police Station
- The Outlast Trials Guide | How to Complete the Main Mission in Fun Park
- The Outlast Trials Guide | How to Complete the MK Challenge 1 in Fun Park
- The Outlast Trials Guide | How to Complete the MK Challenge 2 in Fun Park
- The Outlast Trials Guide | How to Complete the Main Mission in Orphanage
- The Outlast Trials Guide | How to Complete the MK Challenge 1 in Orphanage
- The Outlast Trials Guide | How to Complete the MK Challenge 2 in Orphanage
- The Outlast Trials Guide | How to Complete the Main Mission in Farewell Mansion
- The Outlast Trials Guide | How to Unlock and Complete Program X
- The Outlast Trials Guide | How to Earn Release Tokens
- The Outlast Trials Guide | What is Difficulty Modifiers
Editor, NoobFeed
Latest Articles
No Data.