
Diablo IV: Lord of Hatred Guide | Understanding Gear and Items
Here' a guide on gears and items in Diablo IV Lord of Hatred.
Game Guide by Mash Rahman on May 26, 2026
The path you take through Diablo IV is nearly defined by items such as weapons, armor, and jewelry. The equipment you make up your character with will not only determine your raw damage output, but your survival against the denizens of the Burning Hells.
The most important skill a player can master is how to assess these items.
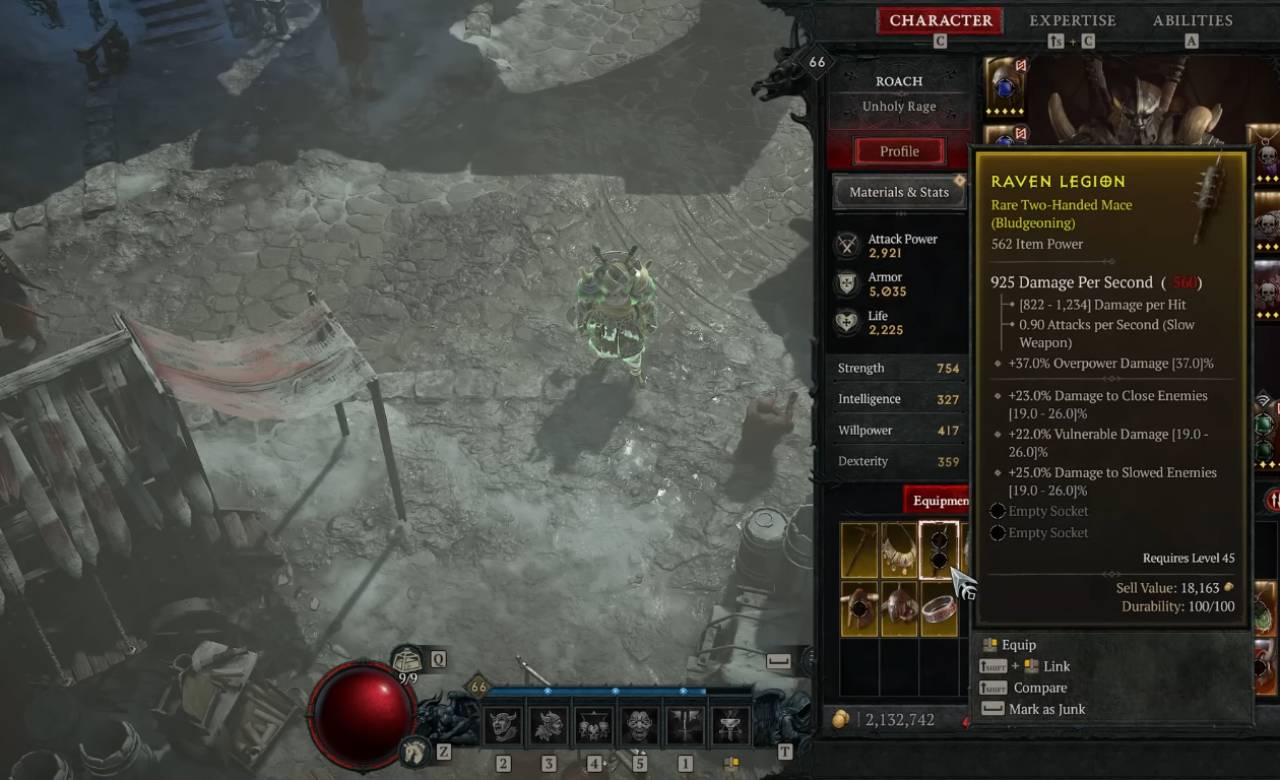
The Core Foundation of Sanctuary's Loot System
Loot is also common at every point in the game, from defeated monsters, hidden chests, and events happening in the world. Each gear slot is tailored to a specific aspect of character building. For example, the damage scaling of your skills is applied to your weapons, and your torso armor and pants are your primary source of physical defense.
To master the grind and make the progression from a casual leveling experience to a dedicated endgame grind, one has to know how to work with itemization. There is no way to tell by just glancing at whether an object glows orange or yellow that it's of any value. Rather, you should dissect its hidden values, base properties, and potential for crafted upgrades.
The Power of an Item and how Statistical Scaling works.
The item's power rating is the maximum limit for any piece of equipment. The power of an item is the baseline of the item, which directly relates to the actual weapon damage or armor it provides. At its basic level of damage per second, a high-item-power weapon is going to be able to do more damage than a lower-rated weapon.
Along with base armor and damage, item power sets the range of all of the secondary attributes assigned to the gear piece. These secondary attributes are referred to as affixes and are rolled in a random fashion in a given minimum/maximum range specific to the item power level. The higher the level and the more challenging the environment, the more power items are dropped.
This will mean that your character will continuously be replacing their gear with new gear with better base stats as you level up. Generally, it's a bad idea to stick with stats just because their power level is low. The mechanism of min-maxing can only come into play at the max entry level item cap in the deeper endgame.
Understanding the Rarity of items
Items drop at a variety of rarities, reflecting the items' complexity and cap power. Common white items and magic blue items are the starting point for gear, and have either no affixes or extremely few statistical lines. These initial levels are quickly outclassed as your character advances to higher levels.
Yellow colors are rare and will have multiple random affixes that can be an exact match for your build. A rare item that's been well-rolled can be massively modified and improved using the various crafting systems, and thus has a great amount of value. They are the most important raw materials when salvaged, and they are the backbone of early endgame gear sets.
Legendary orange gear bolsters both itemization and the item's aspect, adding a powerful passive effect that alters your build, in addition to the usual affixes. These legendary aspects can transform the way your abilities work, with potential for huge damage boosts or special shields. Situated at the highest end of the hierarchy are unique and elusive mythics, which offer attunement to stat selections that are completely fixed, as well as powers that are inescapable.
The Codex of Power and Legendary Imprinting.
The secret to customizing your devices is to use the Codex of Power and the legendary aspect library. Salvaging a legendary item that has a useful passive power permanently adds that passive power into the collection of the player's account. This is a grand system that never allows you to give up on a valuable power because you outgrow the object to which it was bound.
.jpg)
After safely recording an aspect in the Codex of Power, you can go to a local Occultist to imprint that exact effect onto a clean rare or legendary item. A rare item will be immediately upgraded to legendary status, and will retain its base affixes but also be imprinted with the chosen passive power. This mechanic means you're able to upgrade your gear all the time, without limiting the base of your ACTIVE combat build.
When you imprint these powerful passive traits on your gear, it's crucial to take into account the slot you choose. Some equipment can double or even triple the power of an aspect; two-handed weapons can double the power and amulets can increase this by half. It is important to play your best offense in these high-damage slots.
Advanced Crafting and the Blacksmith's role.
Your local blacksmith is your main source for proper gear maintenance, material processing, and item reinforcement. As you travel, your gear will gradually become more and more worn, and you need to buy at the forge to restore your defensive stats as you lose equipment in battle. The blacksmith is also a place to disassemble unwanted machines and gain access to endgame crafting components.
The more difficult the terrain, the more specialized systems, such as tempering, are required to introduce new forms of power into the equipment. Tempering is the process of spending manuals to add custom statistical lines to your rare and legendary items, allowing you to tailor them to your build needs. This is the process that connects raw drops with extremely specialized combat tools.
After your affixes and tempers are set, you'll begin to explore the challenging masterworking system to slowly increase the values of any current stats. Masterworking is a series of twelve levels that transform and enhance an item, using rare resources gathered from more difficult endgame activities. Every 10 or 15 ranks, a random critical bonus will be applied to one affix, making it extremely valuable, thus making it appear bright blue or yellow.
Socketing and Fine Tuning with the Jeweler
It's important to visit the town jeweler on a regular basis to manage your character's defenses and resource pools. The special crafter can cut and upgrade raw gems, which can be inserted into the corresponding slots within your armor, weapons, and jewelry. Depending on the gear piece in which you place the gemstone, each type offers a unique advantage.
For example, rubies in armor will give you more maximum life, and skull gems in weapons or armor will boost your base armor value. When a magnificent item of jewelry is dropped without natural sockets, the jeweler can carve new sockets from rare world materials. This means that a lack of sockets will never take the perfect statistical roll out of the running.
The jeweler can also deal with the management of more and more sophisticated runes, which may be employed in combination to make potent condition-based triggers during battle. You can also add a trigger rune to an effect rune to make your character use a particular defensive skill or release huge amounts of energy. This high level of customization enables you to buff up the areas you find weak and build a full elemental resistance cap.
Practice optimization on Attributes with the Occultist!
The best looking low-level drops will often have just a single stat line that is completely off your current build targets. To solve this problem, you will need to consult the town Occultist to be able to do the fine art of item enchanting. Enchanting lets you choose one of your not-so-desirable modifiers on a rare or legendary item and roll the alternative instead.
.jpg)
This system offers a crucial safety net, preventing the rejection or salvage of substandard products. But enchanting is a very expensive process; every reroll on the same item costs more gold and rare materials. Due to this growing tax, it's important that you're careful and know when to end a difficult piece of gear.
Of course, there are some things which are immune to this enchanting process, because their stat lines are set by design – it's also important to remember that there are unique and mythic items, and they are not affected. The key to getting god-tier gear out of regular loot is mastering the balance between enchanting, imprinting, and masterworking. Instead of viewing each drop as a product, you can think of it as a tool that can be shaped to create the ideal warrior for conquering Sanctuary.
Also, check out our Diablo IV Review, Diablo 4: Vessel of Hatred DLC Review, and other guides below:
- Diablo IV: Mythic Gear Guide | How to Farm Mythic Items
- Diablo IV: Lord of Hatred Guide | How to Beat Uber Lilith
- Diablo IV: Lord of Hatred Guide | How to Beat Tormented Andariel
- Diablo IV: Lord of Hatred Guide | How to Beat Tormented Duriel
- Diablo IV: Lord of Hatred Guide | How to Beat Tormented Beast in the Ice
- Diablo IV: Lord of Hatred Guide | How to Beat Tormented Lord Zir
- Diablo IV: Lord of Hatred Guide | How to Beat Tormented Grigoire
- Diablo IV: Lord of Hatred Guide | How to Beat Tormented Varshan
- Diablo IV: Lord of Hatred Guide | Forging an Unstoppable Champion
- Diablo IV: Lord of Hatred Guide | Paladin Build: Mastering the Zealous Shredder
- Diablo IV: Lord of Hatred Guide | Paladin Build Mastering the Falling Star Arbiter
- Diablo IV: Lord of Hatred Guide | Paladin Build: Mastering the Holy Purifier
- Diablo IV: Lord of Hatred Guide | Warlock Build Mastering the Umbral Chains Weaver
- Diablo IV: Lord of Hatred Guide | The Ultimate Endgame Build
- Diablo IV: Lord of Hatred Guide | Essential Tips and Tricks for Traversing Sanctuary
- Diablo 4 Guide | Warlock Build Mastering the Blood Pact Invoker
- Diablo 4 Guide | Mastering the Pinnacle Challenges of Sanctuary
- Diablo IV: Lord of Hatred Warlock Build Guide | Mastering the Shadow Summoner
- Diablo IV: Lord of Hatred Guide | How to Choose Your Ideal Class
- Diablo IV: Lord of Hatred Guide | Warlock Build Mastering the Brimstone Apocalypse
- Diablo IV: Lord of Hatred Guide | Mastering the Frost Juggernaut
Contributor, NoobFeed
Latest Articles
No Data.