
Diablo IV: Lord of Hatred Guide | How to Unlock Nahantu Tiger Mount
Here's a guide on how to get Nahantu Tiger Mount
Game Guide by Mash Rahman on May 26, 2026
The addition of the expansive jungle region of Nahantu in Diablo IV brought a completely fresh wave of cosmetic and functional rewards for dedicated players. Among the most striking additions is the introduction of feline mounts, which gracefully replace traditional horses for adventurers looking to traverse Sanctuary with a bit more predatory flair.
Of all the cat mounts made available through gameplay, the magnificent Nahantu Tiger stands out as an absolute crown jewel for collectors. This creature features an incredibly sleek, powerful visual design that instantly signals a player's dedication and mastery over the expansion's unique challenges.
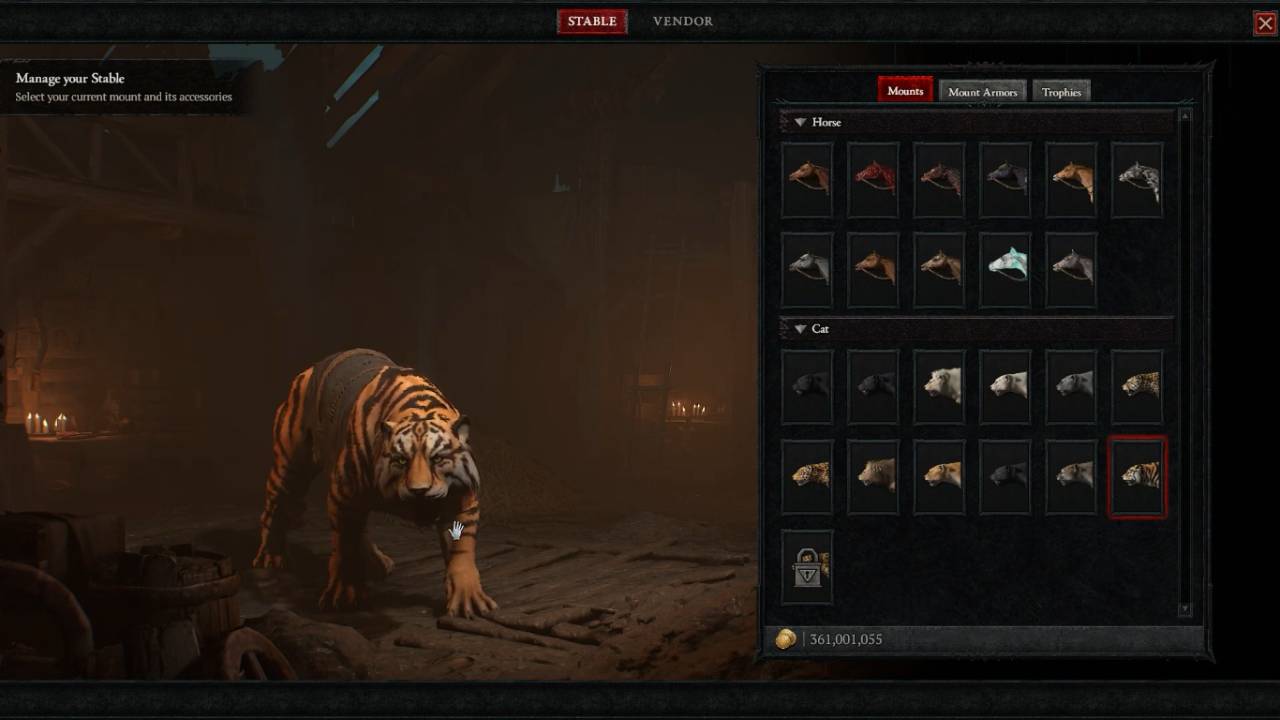
Earning this striped companion does not rely on opening your wallet in the premium shop or getting lucky with a random drop from a world boss. Instead, it serves as a direct badge of honor earned by conquering one of the game's most intense endgame activities. The journey to unlocking the tiger requires an investment of time, a refined character build, and an intimate understanding of the ancient ruins hidden beneath the Kurast Bazaar.
The Core Requirement for the Hunt
To add the Nahantu Tiger to your stable, you must successfully complete fifty individual runs of the Kurast Undercity at maximum attunement. This requirement sounds straightforward on paper, but it represents a significant endurance test that will push your efficiency to its limits.
Many players initially believe that you need to farm rare and expensive dungeon keys, known as tributes, to make progress toward this achievement. However, a crucial piece of advice for prospective tiger hunters is that tributes are entirely optional for this specific unlock.
You can choose to run the vanilla version of the Kurast Undercity without placing any keys into the spirit flame, and every single maximum attunement completion will still count toward your total of fifty. This realization removes a massive hurdle, as you do not need to spend hours gathering high-tier tributes from the Tree of Whispers or Helltide chests just to attempt a run. Instead, you can focus purely on mastering the baseline layout of the dungeon and executing your strategy flawlessly back-to-back.
Unlocking and Entering the Undercity Ruins
Before you can begin your fifty-run marathon, you must first ensure that your character has properly unlocked access to the Kurast Undercity activity. This requires completing the priority campaign quests within the Nahantu region, specifically pushing through the storyline until you establish a presence in the Kurast Bazaar.
Once the introductory quests are completed, the spirit flame brazier becomes permanently available as a portal hub. To start a run, you simply interact with the brazier and choose whether to apply a tribute or descend into the dungeon completely free of charge.
.jpg)
Upon passing through the portal, your character will materialize inside a protective glowing circle at the entrance of the first floor. This starting area is completely safe, and the game's aggressive countdown timer will remain frozen as long as you stay within its boundaries. This gives you a brief moment to check your skill configurations, ensure your potions are full, and prepare your route before launching into the frantic time trial ahead.
Managing the Clock Against the Afflicted
The moment your feet cross the threshold of the protective starting circle, the Kurast Undercity transforms into a ruthless race against the clock. You are granted a limited baseline pool of seconds to navigate the multi-floor layout, and letting that timer hit zero results in an immediate failure of the run.
To keep the countdown from expiring, you must actively seek out and destroy specialized demonic forces known as afflicted monsters. These specific enemies are easily identifiable on your screen by the distinct skull and orange hourglass icons floating directly above their heads.
Slaying a standard afflicted minion or a lesser afflicted elite will instantly inject precious seconds back into your timer, extending your lifespan within the district. Because of this mechanic, you cannot simply sprint past every pack of monsters in a desperate dash for the next floor. You must strike a careful balance between forward momentum and systematic execution, deliberately diving into afflicted groups to harvest the time extensions necessary to keep your run alive.
Scaling Attunement to the Absolute Maximum
While managing your remaining time is essential for survival, the true way to unlock the Nahantu Tiger is to fill your attunement bar to its absolute ceiling. Your current progress is tracked by a four-staged meter located directly below your mini-map on the right side of the screen.
To achieve a maximum attunement run, this bar must be completely filled to rank four before you step through the final portal to face the district boss. While slaying standard enemies gives tiny increments of progress, the most efficient method to scale your meter is interacting with Spirit Beacons.
These points of interest are marked by blue flame icons on your map and serve as the primary engines of your attunement growth. Activating a regular Spirit Beacon will immediately cause dense waves of aggressive monsters to manifest out of thin air all around your character. You must completely wipe out every single monster tied to that specific event to formally secure the massive burst of attunement points.
Overcoming the Grand Beacons and Goblins
As you push deeper into the ruins, the layout will guide you across three distinct floors, each featuring escalating densities of enemies and more complex pathways. At the conclusion of the second floor, players will invariably encounter a massive structure known as the Grand Spirit Beacon.
This event functions like a standard beacon but on a vastly larger scale, summoning multiple waves of powerful elite enemies that test your character's area-of-effect damage. Successfully clearing a Grand Spirit Beacon provides the single largest chunk of attunement progress available in the entire dungeon, often instantly pushing a lagging meter over the edge to rank four.
In addition to these static beacons, you should keep a sharp eye out for elusive creatures known as Portal Pranksters. These unique treasure goblins occasionally spawn in random corners of the map and will desperately try to escape through dimension portals to waste your time. If your build features enough burst damage to eliminate a Portal Prankster before it flees, you will be rewarded with a massive injection of attunement and an extra chest at the end of the run.
.jpg)
Streamlining the Endgame Boss Rush
The exact moment your attunement meter flashes bright and signals that you have officially reached rank four, your structural objective within the dungeon completely shifts. Once you hit maximum attunement, continuing to clear standard packs or activating remaining Spirit Beacons offers absolutely no additional mechanical benefit toward unlocking your mount.
At this point, the most optimal strategy is to completely ignore the remaining trash mobs and sprint directly for the final exit portal. Conserving your real-world time is just as important as managing the in-game clock when you are committing to a lengthy fifty-run grind.
Stepping through the final portal transports you directly into the inner sanctum of the district boss, where the stressful countdown timer disappears entirely. Without the pressure of the clock, you can calmly focus your full attention on executing the boss mechanics safely and picking up your loot.
Repeating this exact loop fifty times requires incredible patience, but the moment the achievement triggers and the Nahantu Tiger enters your collection, the long hunt will feel entirely justified.
Also, check out our Diablo IV Review, Diablo 4: Vessel of Hatred DLC Review, and other guides below:
- Diablo IV: Lord of Hatred Guide | How to Get all the Cat mounts and Armors
- Diablo IV: Lord of Hatred Guide | Understanding Gear and Items
- Diablo IV: Mythic Gear Guide | How to Farm Mythic Items
- Diablo IV: Lord of Hatred Guide | How to Beat Uber Lilith
- Diablo IV: Lord of Hatred Guide | How to Beat Tormented Andariel
- Diablo IV: Lord of Hatred Guide | How to Beat Tormented Duriel
- Diablo IV: Lord of Hatred Guide | How to Beat Tormented Beast in the Ice
- Diablo IV: Lord of Hatred Guide | How to Beat Tormented Lord Zir
- Diablo IV: Lord of Hatred Guide | How to Beat Tormented Grigoire
- Diablo IV: Lord of Hatred Guide | How to Beat Tormented Varshan
- Diablo IV: Lord of Hatred Guide | Forging an Unstoppable Champion
- Diablo IV: Lord of Hatred Guide | Paladin Build: Mastering the Zealous Shredder
- Diablo IV: Lord of Hatred Guide | Paladin Build Mastering the Falling Star Arbiter
- Diablo IV: Lord of Hatred Guide | Paladin Build: Mastering the Holy Purifier
- Diablo IV: Lord of Hatred Guide | Warlock Build Mastering the Umbral Chains Weaver
- Diablo IV: Lord of Hatred Guide | The Ultimate Endgame Build
- Diablo IV: Lord of Hatred Guide | Essential Tips and Tricks for Traversing Sanctuary
- Diablo 4 Guide | Warlock Build Mastering the Blood Pact Invoker
- Diablo 4 Guide | Mastering the Pinnacle Challenges of Sanctuary
- Diablo IV: Lord of Hatred Warlock Build Guide | Mastering the Shadow Summoner
- Diablo IV: Lord of Hatred Guide | How to Choose Your Ideal Class
- Diablo IV: Lord of Hatred Guide | Warlock Build Mastering the Brimstone Apocalypse
- Diablo IV: Lord of Hatred Guide | Mastering the Frost Juggernaut
Contributor, NoobFeed
Latest Articles
No Data.