
Diablo IV: Lord of Hatred Guide | How to Beat Priestess of Hatred Boss
Here's a guide on how to beat the Priestess of Hatred in Diablo IV Lord of Hatred
Game Guide by Mash Rahman on May 27, 2026
Sanctuary is a world of grim and unrelenting horrors, but few places feel as steeped in pure, concentrated malice as the dark corners of the Nahantu jungle. Players will become Neyrelle as they work through the grand story of the Vessel of Hatred campaign expansion, and the full extent of Mephisto’s evil will be uncovered.
To advance, adventurers must seek out the Priestess of Hatred, an incredibly beautiful and mechanically challenging story boss. She can be found in a horrible location known as the Befouled Clearing, deep within the Hierophant Pyre.
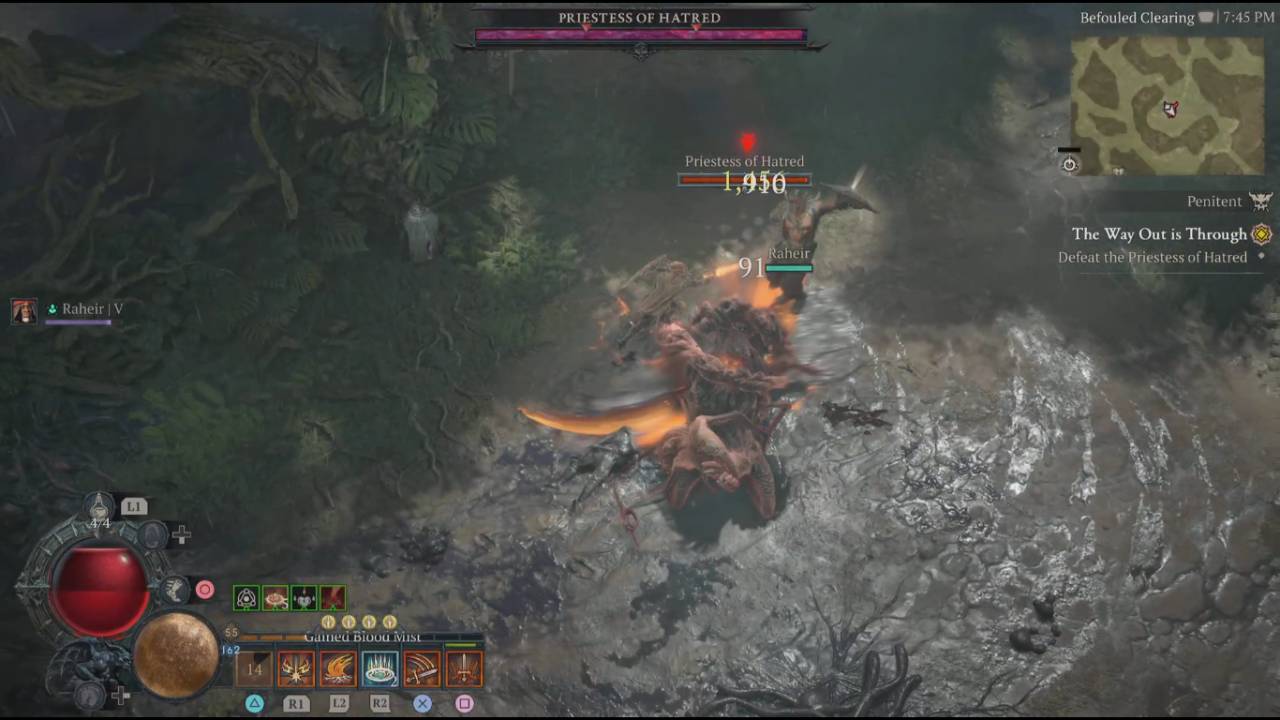
This monstrous high priestess is encountered at a critical story checkpoint in the main story quest line, The Way Out Is Through. Upon entering her desecrated arena, it is immediately obvious that this is no ordinary, lumbering demonic brute. The Priestess of Hatred is a monstrous, towering mass of flesh and dark corruption, moving with an unnatural, fluid speed that belies her massive physical stature.
Killing this boss is a required challenge to unlock the next parts of the expansion story and explore deeper into the dense lore of the region. This encounter is purposefully designed to be a brutal filter for players who rely solely on passive face-tanking or slow combat rotations.
In order to make it through the fight, you need to be intimately familiar with the choreography of blood magic, you need to be able to switch targets quickly, and you need to be able to move in a highly reactive manner in different directions.
The Perils of Over-tuned Blood Magic
The priestess’s magical arsenal is surprisingly lethal and tuned to high damage, and it’s one of the defining talking points for players who make it to the Befouled Clearing. There are plenty of characters in the campaign right now who can just casually stroll through hostile territory without even glancing at their defensive stats or optimization boxes. The Priestess of Hatred immediately breaks this casual momentum with a mechanical wall of several nearly untelegraphed, highly punishing abilities.
This encounter is a sudden, sharp difficulty spike, particularly for those who have chosen to tackle the campaign on higher world tiers such as Expert or Penitent. Her main magical hits do an amazing amount of raw shadow and blood damage that can easily take out ninety percent of a character's health bar in a split second. One mistake in her phase changes will quickly drain your healing potions and send you back to the checkpoint.
To combat this extreme danger, you must set your passive survivability metrics higher than they were before you entered her corrupted clearing. Getting your shadow and physical resistances as close to their baseline caps as possible will give you a crucial defensive cushion against her explosive spells.
A visit to the local blacksmith to temper extra maximum health stats onto your chest piece or trousers can provide your character the sliver of life needed to survive a sudden mechanical overlap.
.jpg)
Decoding the Blood Beams & Fast Strikes
The fight begins as soon as you cross the threshold of the clearing, the priestess using her great agility to close the distance at once. Her main melee toolkit consists of a set of sweeping physical claw strikes that have a surprisingly wide arc in front of her. She is incredibly fast in her attacks despite her bulk, so standing directly in the path of her face is a very dangerous thing to do.
The key to surviving her base phase is to stick to a strict diagonal kiting pattern, using your evasion charges to always stay behind her huge torso. Her forward-facing claw sweeps are rendered harmless by the tight positioning circle around her flanks, and you are constantly dumping your main offensive skills into her back. This rhythm of staying away means you can safely chip away at her health pool while holding your core defensive cooldowns for her real magical channelings.
Her signature Blood Beam is her most iconic and dangerous mechanic, an incredibly powerful channeled spell that completely dominates the battlefield. The priestess will gather deep crimson energy into her core, and then unleash a massive, continuous laser of concentrated blood magic that cuts directly across the arena floor. This beam follows your character's movement, and getting caught in its path, even for a split second, will inflict heavy ticking damage over time and will bypass your active barriers at a rapid rate.
You can’t just run backward in a straight line to survive the tracking velocity of this devastating laser; the beam will easily catch up to your positioning. As soon as you notice the red light forming around her body, you must immediately run a tight clockwise circle around her immediate axis. It’s the trick of spinning your character quickly around the boss’s hitbox so that you can stay ahead of the beam’s tracking speed and the deadly laser will pass harmlessly over your character.
Breaking Up the Swarm and Dealing with Add-ons
When you deplete parts of her health bar successfully, the Priestess of Hatred will change her strategy briefly into a very disruptive summoning phase. She’ll retreat slightly, unleashing a wave of dark energies that spawn localized corruption pods throughout the dirt, flooding the small arena with aggressive, lesser cultists and demonic constructs. These little adds don't have the individual, catastrophic power of the priestess herself, but they are there for a very deliberate tactical purpose.
The main purpose of these minor waves of enemies is to pressure your positioning, body-block your escape routes and deny you from doing your circular kiting path around the Blood Beam cleanly. If your specific character build is heavily focused on single target boss damage, you can easily get yourself stuck and pinned down by the sheer amount of surrounding entities. You can also quickly clear the field of these additional threats with your core area of effect skills, crowd control traps, or pulling mechanics.
Architecturally, getting rid of these subordinate enemy waves gives you a vital mechanical lifeline that you can actively exploit to your advantage. The primary way to get the game to drop healing potion charges on the floor of the arena so you can replenish your supplies mid-fight is to kill these lesser enemies. For classes that generate resources or stack passive offensive multipliers through kills, this short add phase is a time to build up full charges of their high-tier combat systems before returning to the boss.
.jpg)
Running to Victory in the Final Stretch
The final stage of the confrontation is when all of her individual mechanics are fully escalated, and the Befouled Clearing becomes a complete mess. The priestess will start to combine her fast melee claws, Blood Beam tracking, and minion summons into a rapid, overlapping cycle. Also, the arena will be filled with permanent pools of corrupted blood that will inflict heavy shadow damage over time to anyone who steps within their bounds.
In these frantic final moments, your last hope of survival is to keep your cool and prioritize absolute spatial awareness over aggressive greed. Resist the urge to lock yourself into long, stationary casting animations that prevent your character from moving out of harm’s way. Whittle away the last little bit of her health. Use quick, high-damage attacks that can be fired while moving so you're constantly dodging her giant swipes.
If you are constantly running into an immovable wall in this last push with your character build, remember external support mechanics are always there to help you tilt the odds in your favor. Utilizing the expansion’s mercenary system to bring in a hardy companion can help draw a lot of the boss’s direct attention, providing invaluable opportunities to safely execute your highest-damaging rotations.
By walking in a disciplined circle, properly preparing your resistance, and being patient, you will silence the priestess, purify the clearing, and continue your way safely through the gripping story of Nahantu.
Also, check out our Diablo IV Review, Diablo 4: Vessel of Hatred DLC Review, and other guides below:
- Diablo IV: Lord of Hatred Guide | How to Get Doom Transmogs
- Diablo IV: Lord of Hatred Guide | How to Unlock Nahantu Tiger Mount
- Diablo IV: Lord of Hatred Guide | How to Get all the Cat mounts and Armors
- Diablo IV: Lord of Hatred Guide | Understanding Gear and Items
- Diablo IV: Mythic Gear Guide | How to Farm Mythic Items
- Diablo IV: Lord of Hatred Guide | How to Beat Uber Lilith
- Diablo IV: Lord of Hatred Guide | How to Beat Tormented Andariel
- Diablo IV: Lord of Hatred Guide | How to Beat Tormented Duriel
- Diablo IV: Lord of Hatred Guide | How to Beat Tormented Beast in the Ice
- Diablo IV: Lord of Hatred Guide | How to Beat Tormented Lord Zir
- Diablo IV: Lord of Hatred Guide | How to Beat Tormented Grigoire
- Diablo IV: Lord of Hatred Guide | How to Beat Tormented Varshan
- Diablo IV: Lord of Hatred Guide | Forging an Unstoppable Champion
- Diablo IV: Lord of Hatred Guide | Paladin Build: Mastering the Zealous Shredder
- Diablo IV: Lord of Hatred Guide | Paladin Build Mastering the Falling Star Arbiter
- Diablo IV: Lord of Hatred Guide | Paladin Build: Mastering the Holy Purifier
- Diablo IV: Lord of Hatred Guide | Warlock Build Mastering the Umbral Chains Weaver
- Diablo IV: Lord of Hatred Guide | The Ultimate Endgame Build
- Diablo IV: Lord of Hatred Guide | Essential Tips and Tricks for Traversing Sanctuary
- Diablo 4 Guide | Warlock Build Mastering the Blood Pact Invoker
- Diablo 4 Guide | Mastering the Pinnacle Challenges of Sanctuary
- Diablo IV: Lord of Hatred Warlock Build Guide | Mastering the Shadow Summoner
- Diablo IV: Lord of Hatred Guide | How to Choose Your Ideal Class
- Diablo IV: Lord of Hatred Guide | Warlock Build Mastering the Brimstone Apocalypse
- Diablo IV: Lord of Hatred Guide | Mastering the Frost Juggernaut
Contributor, NoobFeed
Latest Articles
No Data.