
Jurassic World Evolution 3 Guide | How to Build Real Tour Bridges
Make Tour vehicles cross a clean, functional bridge over paths and habitats without any Monorail glitch.
Game Guide by Jubair Baky on Feb 14, 2026
Bridges instantly make your park look bigger. They add height, create better sightlines, and turn a simple Tour route into a cinematic ride.
In Jurassic World Evolution 3, you can build a “real” bridge that the tour vehicle actually drives on. The method is straightforward. You align everything using a temporary guide, keep the route straight while placing the bridge, and make sure one setting is correct: Collision.
What This Guide Helps You Build
This build gives you a bridge span that your tour track passes through cleanly, so vehicles drive across the bridge deck instead of clipping, wobbling, or dropping. You can place a guest path under it and let dinosaurs move below it. The goal is a bridge that looks natural from every angle and works reliably during gameplay.
What You Should Prepare First
Choose a spot with enough flat ground to put the Tour building and add a straight stretch of tour track. The ground doesn't have to be perfect. You only need room to build the bridge and then carve the river below it.
It also helps to divide the bridge into two parts: the top section, where the car travels, and the bottom section, where the visual drop occurs. The rest is just shaping and decorating if the top layer is flat and even.
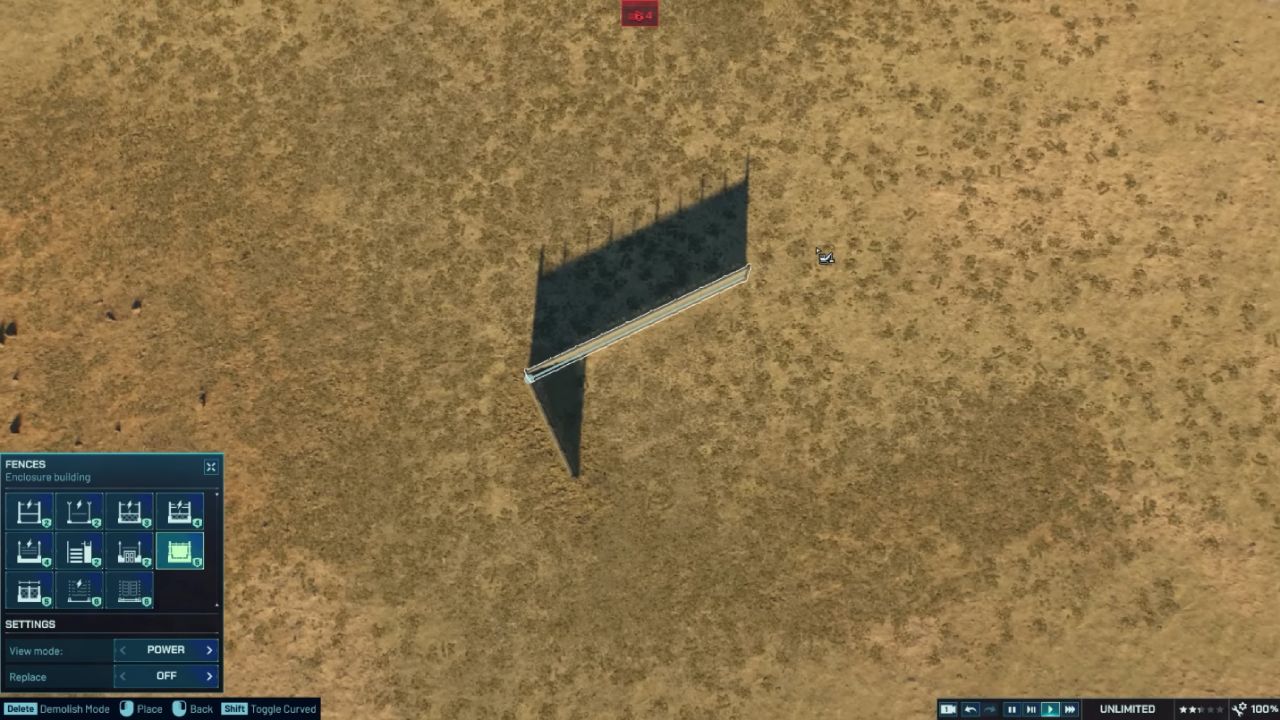
Place a Temporary Fence for Perfect Alignment
Put up fences around the area where the bridge will be made first. Make an L shape out of it. This fence won't be used in the end. It's only there to serve as a straight line.
It's very helpful to do this step. When there isn't a guide, the bridge often gets slightly turned, which throws off the center of the tour track. Once the fence is up, it's easy to line up the bridge and make sure everything is even.
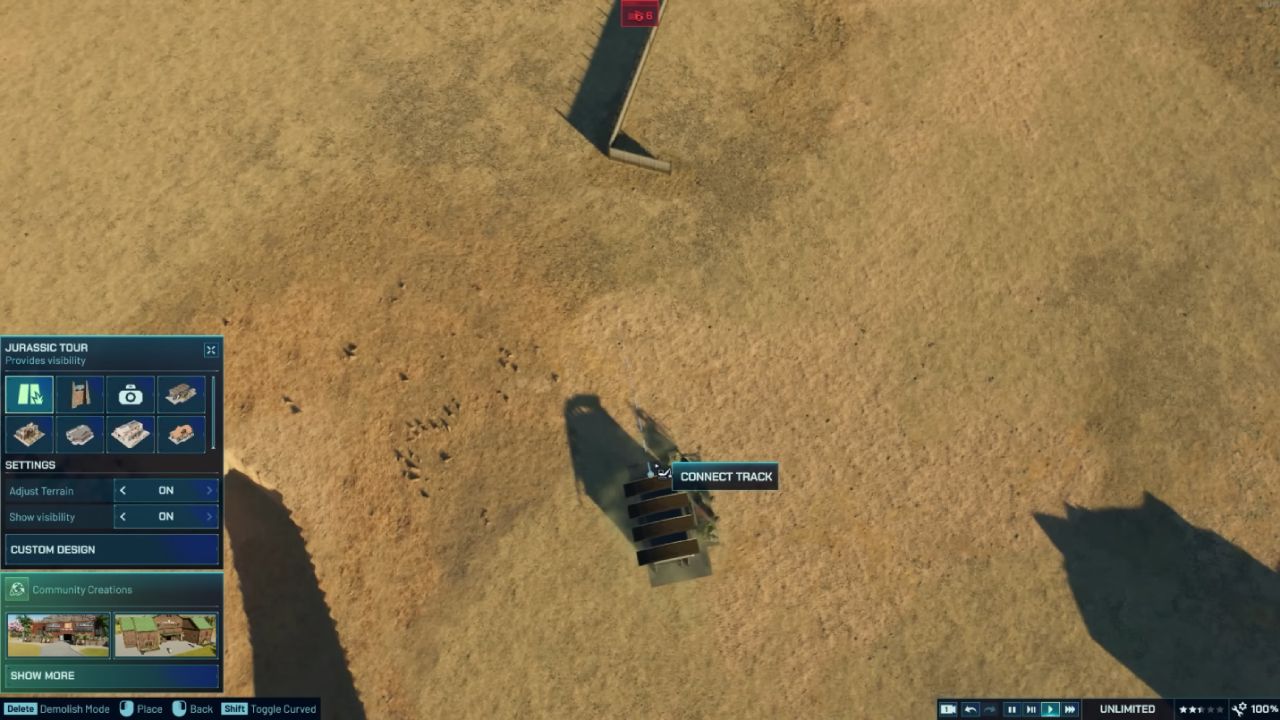
Place the Tour and Build a Straight Tour Track
Next, place the Tour building near the bridge location. Then lay out a straight stretch of tour track in the direction you want the bridge to run. Keep this part simple. You want a clean, straight line that is easy to match with the fence guide.
This straight section is important because it reduces tight turns near the bridge entrance. It also makes the vehicle movement look smoother. A bridge looks best when the vehicle approaches it in a straight line, crosses the span, and exits without a sudden curve.
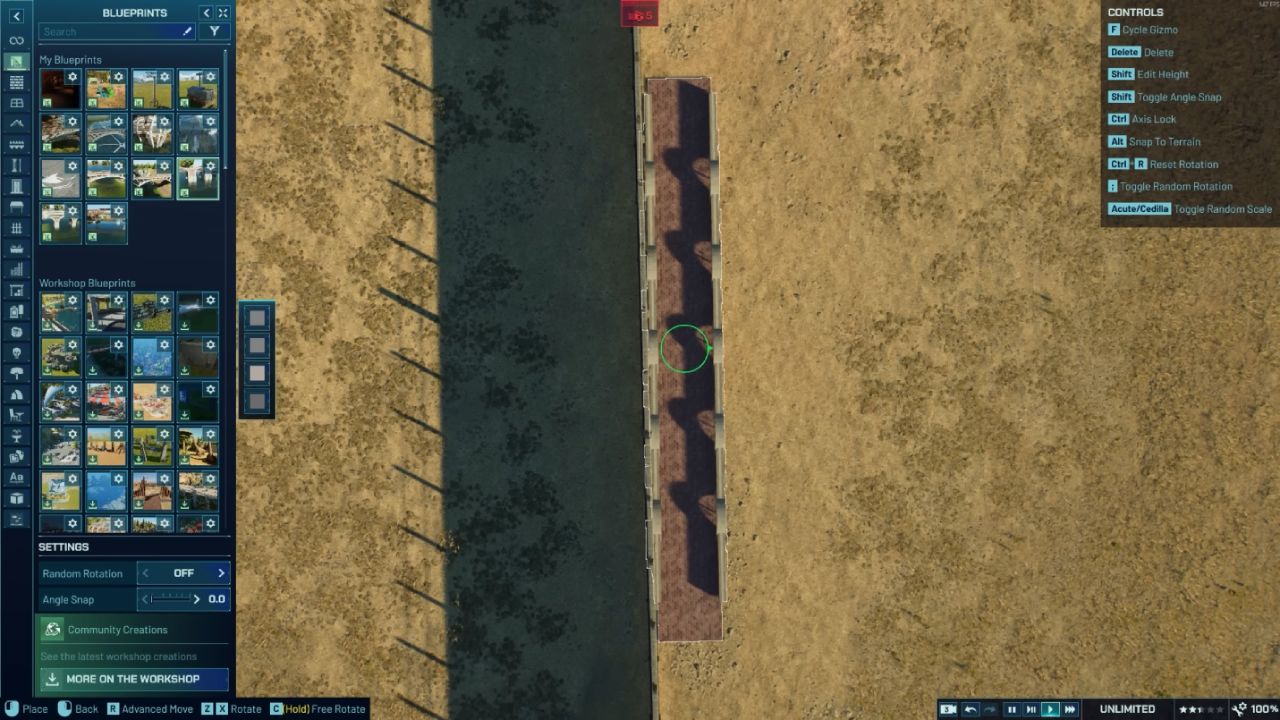
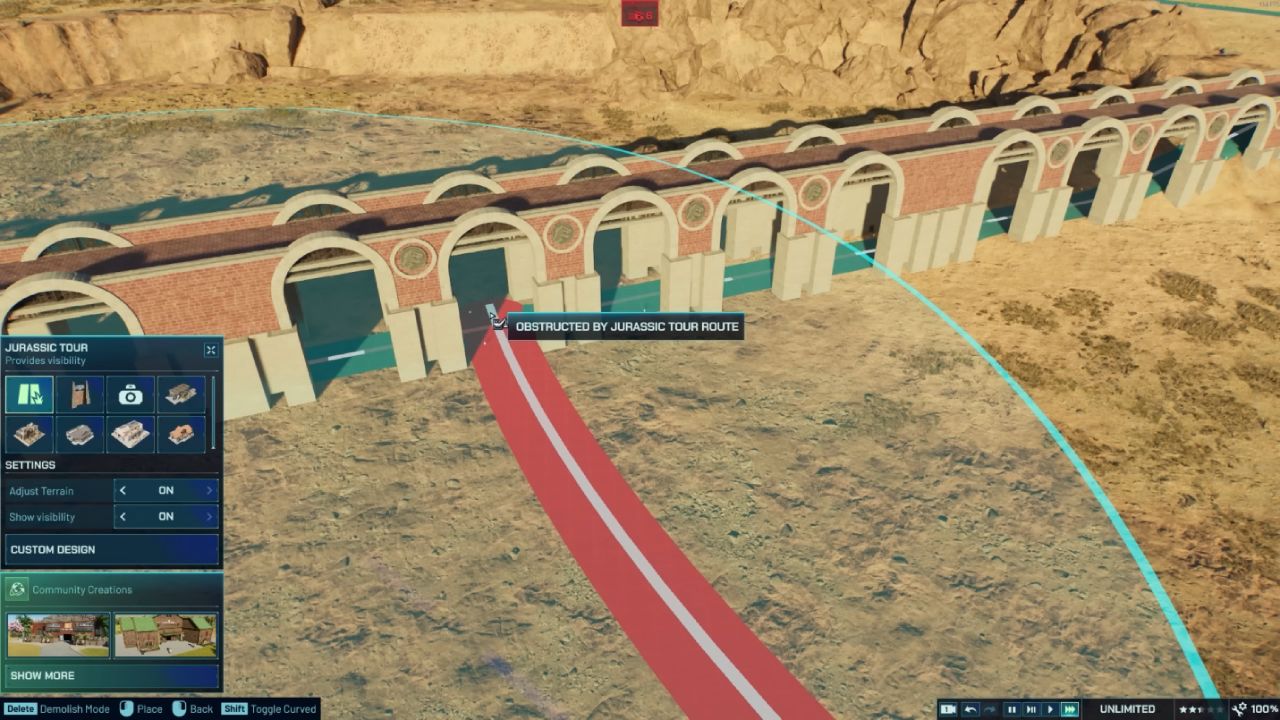
Place the Bridge Blueprint and Center It
Now pick out a bridge plan. If the bridge is lined up right, it doesn't matter what kind it is; a bigger bridge may be easier to work with. Put the bridge about where the fence says it should go. After that, move the bridge so that the tour track goes through the middle.
To get the exact spot you want, use Advanced Move. It matters for small changes to happen here. On both sides of the track, you want the space to be the same. If the bridge seems a little off-center, fix it now, before you shape the ground, because it will be harder to fix later.
To make the bridge stretch longer, make copies of the bridge pieces that aren't long enough. Make sure the whole bridge line is straight. Do not make the bridge go around a corner. A straight bridge looks more realistic, reducing the likelihood that the car will hit the railing.
Lower the Bridge Until the Ends Sit Flush
Bring the bridge down until the ends are level with the ground after it has been lined up. This step changes both how things work and how they look.
Tour cars need to be able to enter and leave without any problems. If the bridge is too high, the approach can look bad if it is a sharp step. When you look at it, a flush bridge looks like it is "built into" the ground instead of hanging above it.
Once you lower the bridge, check the track again. Make sure the tour track still passes through the center and does not clip the railing. If it looks tight, adjust the bridge slightly with Advanced Move.
Sculpt the Valley Under the Bridge
Now carve the terrain under the bridge to create the canyon effect. Keep the slope gentle near the tour track, especially at the bridge entry and exit. Vehicles need a reasonable gradient to climb smoothly.
You can still make the canyon look deep. The trick is to keep a “drivable” zone near the track and make the sides steeper farther away. That gives you dramatic depth without breaking the route.
If you want the bridge to feel higher, do not raise the bridge too much. Instead, lower the terrain underneath. This usually looks better and keeps the entry points stable.
Remove the Temporary Fence and Repair Any Lost Path
Once the bridge and terrain look right, delete the temporary Fence. Sometimes removing it can also remove a nearby piece of path. That is not a problem if you plan for it.
Try to leave a small straight section of path somewhere nearby. Then reconnect the path after the fence is gone. If you are working inside a habitat, this is also a good time to recheck enclosure boundaries to ensure everything stays secure.
At this stage, the bridge should look clean, the track should be straight through the center, and the valley underneath should be forming the scene you want.
Add an Arrival Point and Confirm the Route Works
Add an Arrival Point and check that the Tour path is complete to make sure the plan works perfectly. The car should get close to the bridge, climb it easily, and drive across the span without any strange snapping.
If the vehicle movement looks stiff, it is usually because the approach slope is too sharp or the bridge ends are not flush. Smooth the terrain around the entry points until the transition looks natural.
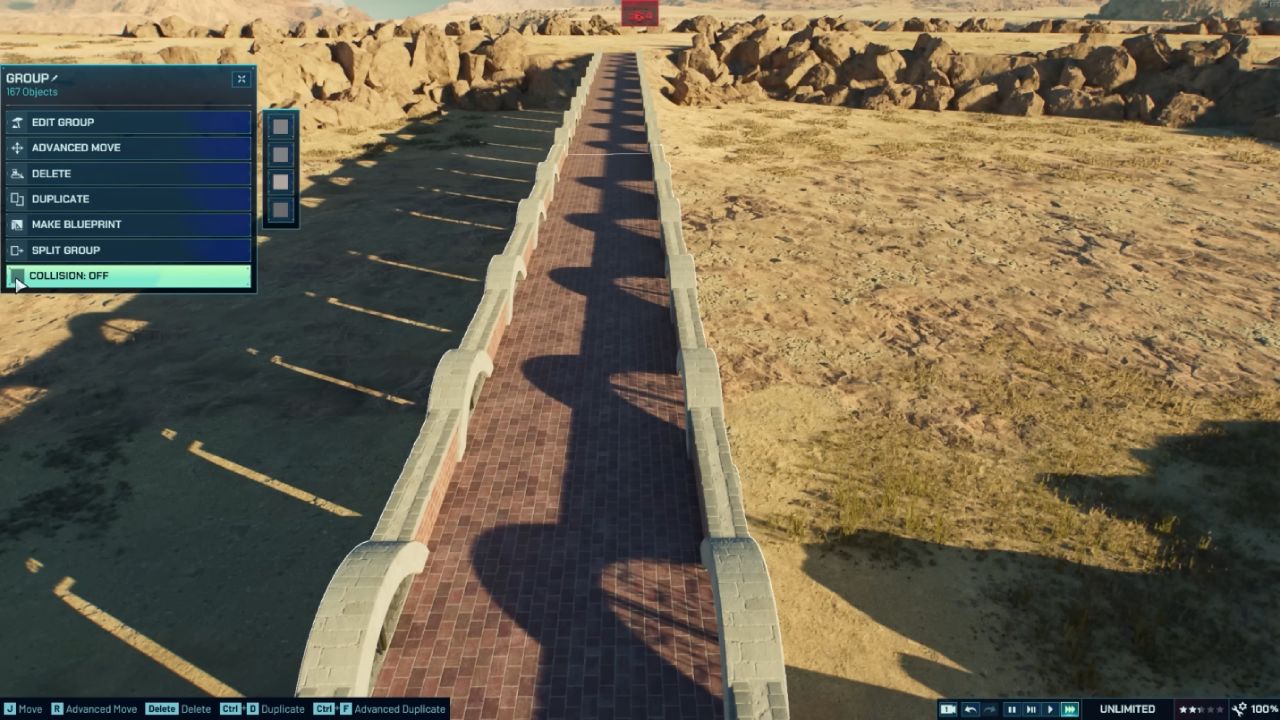
Collision is the One Thing That Can Break the bridge.
The most important technical detail is Collision. The bridge floor pieces that the vehicle drives on must have Collision enabled. If collision is off, the vehicle can fall through the bridge deck.
Even if everything looks fine, this can still happen. Even though the bridge looks solid, the game treats it like empty space if there are no collisions on the drive surface. If the car stops in a certain place, check the floor piece there first.
Simple Fixes for Common Problems
The bridge isn't always in the middle of the tour track if the car hits the side rails. Slide the bridge a little with Advanced Move until the track is level in the middle. Clipping can be stopped with even a small change.
If the car has trouble getting onto the bridge, either the bridge is too high or the approach hill is too steep. Give the bridge a little extra power or smooth out the ground where the car climbs.
If the bridge looks right but the car falls, check the floor pieces for collisions. For the parts of the deck that the car touches, turn it on. Pay attention to the exact spot where the drop takes place.
What You Can Build Under the Bridge
You can put a path for guests under the bridge, which looks great in parks with lots of levels. There may also be dinosaurs moving below, especially if the bridge goes through an ecosystem. This makes a strong visual moment where the tour feels like it's going over something dangerous.
You can also decorate under the bridge with rocks, trees, and terrain shaping. A little clutter underneath makes the bridge feel more grounded and realistic.
Important Limitations You Should Know
Even though the vehicle visually drives on the bridge, the game can still treat the tour track as occupying space below. Because of that, there are limitations.
You cannot run water under the bridge. The game does not allow it where the track is considered to exist.
You also cannot place another tour route underneath, because tour tracks cannot cross, even if one is visually above the other. This is a track system limitation, not an alignment issue.
These limits are easy to work around. Use under-bridge space for paths, habitat terrain, and decoration rather than water or track crossings.
Works With Other Tour Types Too
This same method works with the Gyrosphere and the Ford Explorer Tour. The Ford Explorer Tour is especially easy because its track has a clearly visible line that helps with centering. Till the fence guide method remains the most consistent way to keep bridge alignment perfect, especially when you want clean symmetry.
Once the bridge works, the visual polish is what makes it feel “real.” Keep the bridge deck area neat and readable. Then make the valley sides rougher and more uneven. A clean top and rugged bottom sell the effect.
Also, check out our other guides:
- Jurassic World Evolution 3 Guide | How to Use the New Island Generator
- Jurassic World Evolution 3 Guide | How to Adjust Slopes and Create Waterfalls
- Jurassic World Evolution 3 Guide | All Attractions
- Jurassic World Evolution 3 Guide | How to Set Up Attractions on Enclosures
- Jurassic World Evolution 3 Guide | Best Attractions of the Game
- Jurassic World Evolution 3 Guide | How to Build Structures Piece by Piece
- Jurassic World Evolution 3 Guide | How to Build Circles in Jurassic World Evolution 3
- Jurassic World Evolution 3 Guide | How to Set Up Expeditions
Editor, NoobFeed
Latest Articles
No Data.