
Tales of Arise Guide | How to Beat Eljarania
Here's a guide on how to beat Eljarania Tales of Arise.
Game Guide by Mash Rahman on Jun 03, 2026
As you make your way across Dahna on the revolutionary journey and approach the cinematic climax, a huge structure threatening the world, named The Wedge, violently pierces the planet's surface. This mechanical anomaly acts like a giant siphon, aggressively sucking the world's remaining astral energy to fuel its mysterious masters. And to confront this global environmental disaster, Alphen and his companions must penetrate the deep, sterile, surreal corridors of the central core.
As you make your way along these crystal paths, your party’s forward progress will be rudely interrupted by a massive botanical nightmare. The final gatekeeper of this late-game zone is Eljarania, a towering, grotesque plant-beast. This creature is a big jump in strategic complexity as you’ll have to manage multiple target points at once while dodging localized elemental hazards.
To kill this giant flower monster requires a complex understanding of the mechanics of limb control and spell-weaving. A veteran of the campaign will immediately have a striking sense of familiarity when first dissecting the boss’s structural movements. Eljarania is similar to and acts like Zacarania, the bizarre flower monster that your party defeated in the Gilanne Woodlands of Elde Menancia.
A Reflection Of The Past Horrors
It has the same basic biological design, a huge central bulb supported by a web of vicious, whipping peripheral limbs. But you must not let this familiarity fool you into fighting the battle with a totally relaxed attitude. Eljarania is a massive upgrade over its predecessor with much wider attack radii and significantly larger health pools.
Its tracking is insanely advanced, so its sweeping vines can easily punish characters who overcommit to long ground combos. The real secret to a successful counter-strategy is to know just how this creature modifies the old botanical pattern.
Basic Preparations and Gear Selection
Running directly into the path of a huge botanical boss with unoptimized character gear is a recipe for a quick party wipe. Before you step into the main arena at the heart of the event, take a moment to back out to your menu screens or to the nearest merchant terminal. For this zone, it is strongly recommended to forge Alphen’s newly available weapon upgrades to maximize your physical damage output.
You will want the best raw attack stats you can get to quickly shred through the creature's dense armored plant fibers. This fight is very much a fight of heavy physical impacts and all kinds of sweeping magical hazards, so it's very important that you set up your defensive accessories to keep your party stable. Also, if you can make and equip some high-level Garnet rings or other physical protection items, it will help you a lot. Your main casters will thank you.
This defensive item prevents your frontline characters from being instantly staggered by surprise thrashing. Also make sure to fully replenish your inventory with necessary medical consumables before triggering the boss fight. Use your gald for a healthy max supply of Apple Gels & Treat Gels for instant, flat HP recovery.
You’ll also need a good stash of Orange Gels to keep replenishing your shared Cure Points pool as the battle rages on. It’s a great insurance policy to have a few Life Bottles on hand in case a character gets suddenly knocked out by a heavy overhead tentacle slam.
Exploiting Elemental Weaknesses
Eljarania has a massive health pool, so you’ll want to learn how to aggressively exploit its unique elemental weaknesses to cut through it comfortably. This sky-high botanical horror is vulnerable to water and wind astral energies in a way no other creature can be. This very specific double vulnerability provides a huge strategic advantage to players who set up their offensive arts correctly before the battle begins.
If your party has wind-based and water-based titles or combat skills, you can have massive ongoing damage multipliers. Prior to stepping into the confrontation, head to your party settings and manually audit your active combat skills. Hold off on any fire or earth elemental attacks for now, because they won't do the most damage against this particular target.
Instead, fill your active skill slots with cutting wind strikes and crushing fluid techniques. This deliberate elemental preparation makes sure that every attack your party makes will help to break down the monster’s core.
Setting Up the Best Roster and Party AI
Proper character selection is absolutely critical, with the sheer size of Eljarania's reach combined with its multiple attacking appendages. The best active four-person team for this heavy fight is Alphen, Shionne, Rinwell, and Dohalim. Rinwell will be your main offensive powerhouse for this duel, as she has great control of high-level water and wind magic.
You need to directly control Alphen to handle the close-quarters combat right in front of you, while your backline can work from a safe distance. Before going into battle, open your Strategy menu and carefully set your companion's behavioral parameters. Shionne and Dohalim need to be built to be a highly coordinated dual-healing support unit.
Program their AI logic to absolutely prioritize health restoration and status recovery items the millisecond a character's health bar dips below a safe threshold. This division of labor allows you to be completely free to focus on the immediate physical threats.
Meanwhile Rinwell should be firmly ordered to keep maximum physical distance along the outer boundaries of the arena. She carefully places herself in a spot where she is totally safe from the boss's sweeping melee attacks, while she unleashes her devastating spells. Have her AI focus on her best long-range wind and water spells to keep exploiting the monster's natural weaknesses.
Targeting Eljarania Feelers
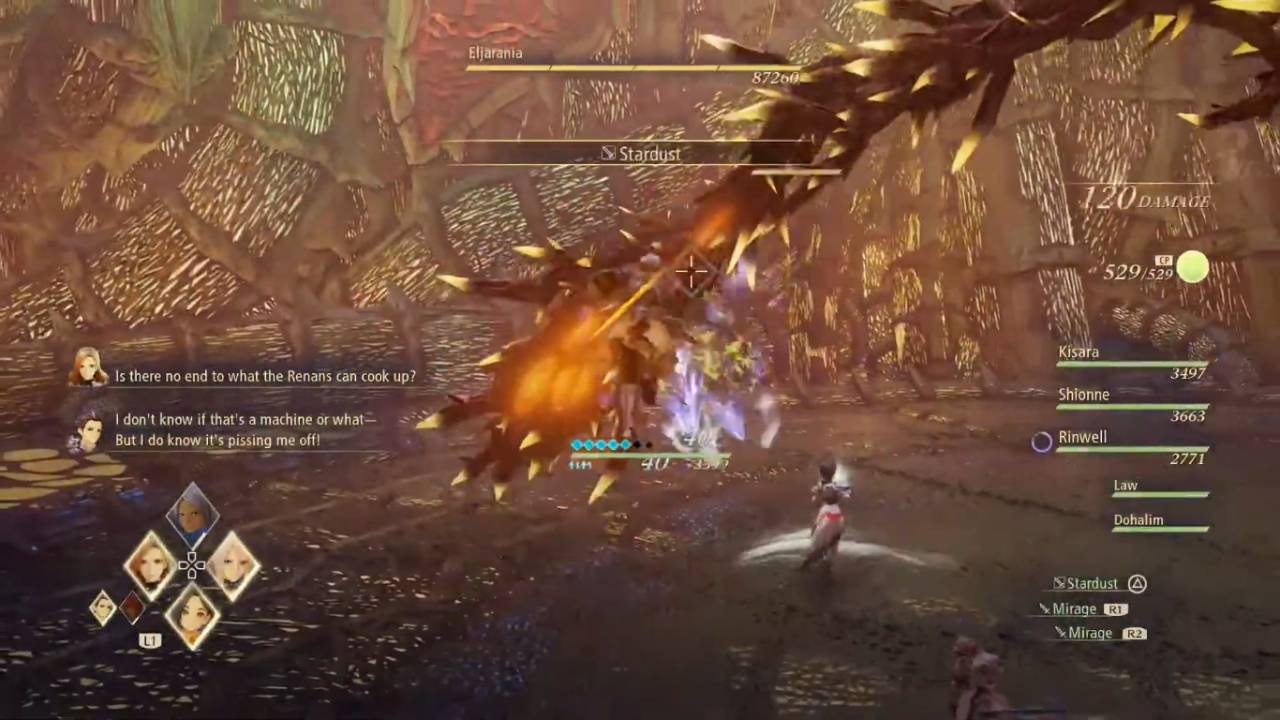
The idea is to keep your spellcasters spread out wide enough so that a single sweeping vine attack can’t catch your whole party all at once. As soon as the battle officially begins, you will notice that hitting the boss's main central body is pointless. Eljarania enters the fight heavily shielded, using only a set of independent appendages called Eljarania Feelers to do battle.
The tentacles are thick and thrashing, acting as separate targets, each with its own health pool and attack patterns. They will slam down upon the stone floor over and over again and create localized shockwaves that can easily knock your characters off balance. This is a complicated botanical defense you need to break through, so don't spread your active damage across multiple targets at the same time.
Be very tactical and disciplined instead and focus all your party's offensive pressure on one Eljarania Feeler at a time. You can get rid of these threats out on the field much faster in a systematic fashion by targeting your attacks. Reducing the amount of incoming damage your team has to take is best done by thinning out the number of active tentacles.
.jpg)
Removing the Limb Weak Spots
As you tiptoe around the thrashing appendages, keep a hyper-vigilant eye on the physical structure of the limbs themselves. Each individual Eljarania Feeler has a glowing weak point at the very tip of its vine. These glowing nodes are susceptible to Alphen’s swift sword slashes and signature physical artes, allowing you to deal massive posture damage.
The absolute key to completely disabling the creature's structural integrity is targeting these specific points. If you take enough concentrated elemental or physical damage on the entire limb, then a feeler’s weak point is violently burst and disappears from the arena. Learning the art of the defensive dodge roll and practicing patience is key to safely taking these low-hanging targets.
When you see a tentacle rear back to strike, perform a well-timed dodge to initiate a Perfect Evade, slowing down the action around you. Immediately counter with a fast Counter Edge attack straight at the glowing node to instantaneously destroy it. Relying too much on these grounded counterattacks is a much safer bet than risking an extended aerial combo that leaves Alphen totally defenseless upon landing.
Rinwell’s Unleashing Advanced Magic
While you’re handling the close-quarters combat with Alphen on the ground, Rinwell will be your ultimate weapon of mass destruction from the backline. She also has the unique ability to store and combine active incantations, allowing her to manipulate the battlefield with unparalleled efficiency. Instead of releasing her basic water spell, Spread, Rinwell can store it in her astral book.
She can use Spread a second time while the first is stored, creating the advanced water arte known as Tidal Wave. This large vortex has a very large area of effect, soaking a large part of the combat arena in high-pressure fluid damage. And with its sheer size, a single Tidal Wave cast will easily hit several of the Eljarania Feelers at once, quickly melting their health bars in unison.
You could also employ a similar mechanical tactic with her wind magic, fusing spells to make the deadly Cyclone arte. Switching between these huge area-of-effect spells completely breaks down the boss’s defensive mechanism before it can retaliate.
Reinforcement Phase Execution
As you sever a number of limbs and reduce the boss's structural integrity, Eljarania will grow more desperate. Eventually, the botanical terror will emit a loud sonar pulse and summon a wave of local zeugle reinforcements to the battlefield. These smaller, highly aggressive minions will spawn around the edges of the arena and will constantly try to distract your frontline and disrupt your casters.
This part can be very easy to panic in as the screen fills with enemy indicators and movement chaos. The golden rule to get through this chaotic escalation is to completely ignore these minor reinforcements and concentrate only on the main boss. You're just taking your main physical damage and sending it away from Eljarania to target small minions, which is just going to drag this out needlessly.
Rinwell’s big, wide-reaching Tidal Wave and Cyclone spells will naturally clip and remove these smaller enemies as a passive byproduct of your main offensive assault. Keep your eyes on the remaining plant parts, and let your passive area-of-effect magic take care of the rest.
Central Core Exposure Navigation
Once all the peripheral Eljarania Feelers have been methodically broken and removed, only then will the main protective shield of the boss finally dissolve. The huge central bulb of the plant will lose its grip and crash helplessly down to the stone floor of the central core. This results in a prolonged severe Core Break state, leaving the primary body completely paralyzed and totally vulnerable to your most powerful attacks.
This is your last chance to exploit its complete vulnerability and inflict heavy damage. Immediately close the gap with Alphen's fastest lunging strikes and ensure you are directly in front of the exposed core. It’s the perfect time to burn up the rest of your health pool on Alphen’s powerful Blazing Sword techniques.
He can use his strongest Flaming Edge artes and cause massive critical damage to the helpless plant body, which won't be able to fight back. Coordinate this offensive push with any remaining companion Boost Gauges to keep the core in a prolonged stagger.
Weathering Over Limit Frenzy
If you fail to kill the boss during this first down window, Eljarania will eventually recover and enter a state of absolute fury. The botanical giant will snap violently upright, wrapping itself in a blazing blue aura. The effect is visible, confirming that the creature has officially entered its Over Limit state, greatly amplifying its aggression parameters.
.jpg)
During this hyper-active phase, it moves at double its normal speed and its natural hyper-armor is completely immune to standard means of destruction. The rest of the vines will lash out across the deck with unblockable force, creating high-velocity wind blasts with no clear charging animation. Trying to trade close-quarters hits with the boss or force an offensive combo while in this state is a very dangerous gamble.
You need to stop thinking offensively and switch Alphen to a 100% defensive playstyle right now. Concentrate exclusively on sprinting in broad, unbroken circles around the arena's outer limits, performing accurate dodge rolls to avoid its tracking routes.
The Finishing Blow
Once the Over Limit storm finally winds down, the creature will be very tired and pause briefly to recover its stamina. This is your final opportunity to close the gap and take a hard-earned victory deep into The Wedge. Use Alphen’s fiery blade attacks along with your party’s remaining Boost Gauges to keep staggering the weakened plant.
Your party draws on the last of its physical and magical resources and pours them into its crumbling frame. The battle is near its end. On your interface, the blue crosshair diamond will start flashing violently, hovering directly above the central botanical core. When this Strike indicator appears, press the appropriate directional pad prompt to perform your cinematic team-up move.
This magnificent final assault will set the plant's structure on fire, ending the dangerous encounter. Conquering Eljarania is a huge milestone that opens the way forward to the deepest secrets of the universe, proving your complete mastery over advanced elemental targeting.
Check out our Tales of ARISE - Beyond the Dawn Edition Review and other guides:
- Tales of Arise Guide | How to Beat Lord Vholran Igniseri
- Tales of Arise Guide | How to Beat Kalmarzel and Kaldinzel
- Tales of Arise Guide | How to Beat Lord Almeidrea and Mesmald
- Tales of Arise Guide | How to Beat Grigere
- Tales of Arise Guide | How to Beat Temararus
- Tales of Arise Guide | How to Beat Lord Balseph
- Tales of Arise Guide | How to Beat the Ice Wolf Leader
- Tales of Arise Guide | How to Beat the Ooze Hive
- Tales of Arise Guide | How to Beat Zacarania
- Tales of Arise Guide | How to Beat Menancia Guard Captain Kisara
- Tales of Arise Guide | How to Beat Lord Dohalim il Qaras
- Tales of Arise Guide | How to Beat Venoflage
- Tales of Arise Guide | How to Beat The Mysterious Swordsman
- Tales of Arise Guide | Unlock the Quaking Continent Trophy
- Tales of Arise Guide | Unlock the Billowing Cyclone Trophy
- Tales of Arise Guide | Basic Combat Mechanics
- Tales of Arise Guide | All Recipe Locations
- Tales of Arise Guide | All Fishing Spots and Fish Locations
- Tales of Arise Guide | All the Locations of the Artifacts
- Tales of Arise Guide | All Astral Flower Locations
- Tales of Arise Guide | Unlock the Big Game Hunter Trophy
- Tales of Arise Guide | Unlock the Wall Smasher Trophy
- Tales of Arise Guide | Unlock the Raging Current Trophy
- Tales of Arise Guide | Unlock the Night Blossom Trophy
- Tales of Arise Guide | Unlock the Veteran Rancher Trophy
- Tales of Arise Guide | Get the Diligent Counterattacker Trophy
- Tales of Arise Guide | Unlock Putting the Past in Its Place Trophy
- Tales of Arise Guide | Conquering the Ultimate Group Training
- Tales of Arise Guide | Ultimate Level 100 XP Farming Strategy
- Tales of Arise Guide | All Dahnan Owl Locations
- Tales of Arise Beginner's Guide | Gameplay Tips & Tricks
Editor, NoobFeed
Latest Articles
No Data.