
Building a Steam Gaming PC With the BC250 PlayStation 5 APU Board
A former crypto mining board transformed into a compact and affordable 1080p SteamOS gaming desktop.
Hardware by Tanvir Kabbo on Feb 24, 2026
The BC250 mining board has recently gained attention among enthusiasts for an unexpected reason. Underneath its large heatsink sits the same processor that powers the PlayStation 5. Because these boards were launched nearly five years ago and have become relatively inexpensive, many people have started transforming them into surprisingly capable and budget-friendly gaming PCs running SteamOS, essentially creating a do-it-yourself Steam Box experience.
Getting a clean-looking setup like this requires a bit of DIY effort, as you need to assemble all the necessary components yourself. However, there is now a kit available that includes nearly everything required to turn the BC250 into a sleek desktop gaming rig that only needs a screwdriver to put together.
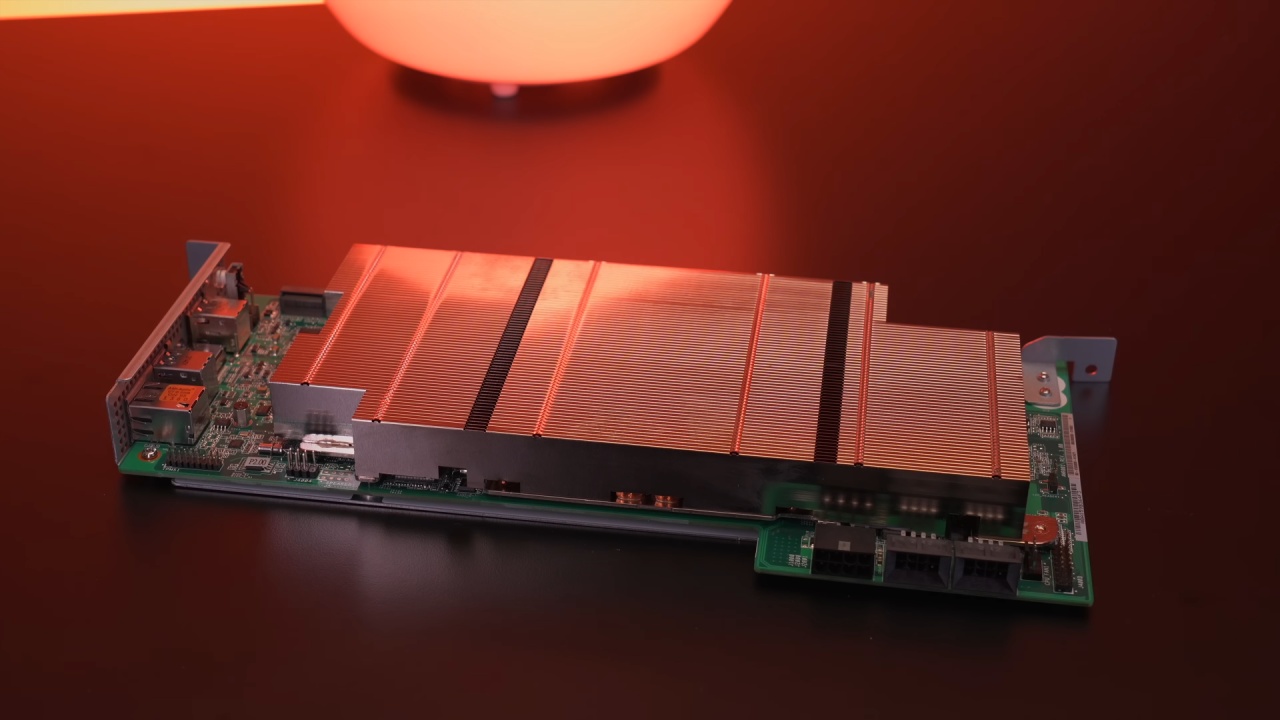
What Makes the BC250 Special?
The BC250 was originally designed for cryptocurrency mining, but what makes it unique is that it uses the same APU found in the PlayStation 5. Even more compelling is the price. These boards can be found for as low as $165 on eBay, offering a solid amount of performance capable of running fairly demanding games.
Fully assembled builds are also available starting around $295, providing a ready-to-go system for those who prefer not to assemble everything themselves. For those who enjoy building, DIY kits include a 3D printed case and the BC250 board. The case quality is impressive, featuring labeled rear IO ports and a Steam logo on the front to give it a true Steam Box aesthetic.
Additional Parts Required
The casing and BC250 board by itself won't make a working system. You will need an M.2 SSD because it works with both NVMe and SATA. You can install a number of games on a 512GB SSD. Also, a 400W ITX modular power supply and the right cables are needed, as well as two 120mm fans to keep things cool.
A custom power switch cable connects the PSU to the front power switch, using a 3D printed plug that bridges the required pins to power the system on and off. With these components, the build remains relatively simple and cost-effective.
Assembly Process
To prepare the BC250, we first remove the two mounting brackets, one near the IO and the other close to the CMOS battery. We then ensure that the two jumpers are positioned correctly on their headers before installing the SSD.
The case assembly begins by snapping together the bottom and back panels. The interlocking tabs are tight and require some force, but once secured, they pivot freely. The rear panel is attached with three screws, and the sliding feet are installed and secured. These feet double as a locking mechanism for the side panel.
Next, we prepare the power supply by connecting the PCIe 6+2 cable and the custom power switch cable to the 14-pin connector. The PSU is mounted inside the case and secured with three screws. We then connect the 8-pin cable to the BC250 and mount the board to the side panel, aligning it carefully with the IO shield before securing it.
You might need to lightly tap the fan mounting brackets to make sure they fit flush. The first fan connects directly to the BC250 header, while the second fan is connected to the first fan in a daisy chain. To keep the airflow clean, the wiring is securely packed away in its own container. We close the case and lock it with the sliding feet after everything is in place.
Software Setup
Updating the BIOS and installing the Linux-based operating system used to run SteamOS is required before gaming. Once configured, installing games is straightforward. Using the Ethernet port ensures fast downloads, though a Wi-Fi dongle with integrated Bluetooth is recommended for wireless connectivity and easy controller pairing.
Installing a GPU governor is highly recommended. Instead of staying at 1500MHz, it lets the GPU change its speed between 1000MHz and 2000MHz based on how much work the system is doing. This makes things run better when they're under load and uses less electricity and heat when they're not.
Gaming Performance
The BC250 works quite well for the price when it comes to performance. At 1080p, a lot of games can run at medium to high settings and still get 30 to 60 frames per second. Resident Evil 2 maintains a steady 60fps at 1080p on fairly high settings and looks excellent. Resident Evil Remake runs flawlessly. Final Fantasy 7 Remake Intergrade also stays close to 60fps during gameplay, though occasional screen tearing and minor frame drops can occur.
More demanding games like Cyberpunk are playable with some tweaking. Doom Eternal had problems with crashing upon launch; resetting the CMOS fixed them. This is a DIY system that runs SteamOS on hardware that wasn't made for it, so you should expect to have to fix things from time to time.
Design and Cooling
The design of the casing puts accessibility first. The hinged panel allows quick access to the internals, making tasks like resetting the CMOS battery or upgrading the SSD simple. The second fan mount swings open, granting easy access to the M.2 drive.
Cooling is another strong point. Two 120mm fans are strategically positioned: the rear fan helps pull heat away from the board, while the front fan draws in cool air, creating effective airflow. This configuration keeps the temps consistent, even while you're playing for a long time.
.jpg)
Controller Support and Experience
SteamOS can tell if an Xbox or PlayStation controller is connected and changes the button prompts on the screen to match. The menu icon adapts to fit the controller being used, making the experience smooth. Bluetooth makes it easy to connect wireless controllers, but you can also use a keyboard and mouse.
Pros and Cons
The price is perhaps the best thing about it. You can get a small 1080p gaming computer that works well for about $160 for the board and a small amount of extra parts.
The design is easy to access and sleek, and the building process is simple. But you can't upgrade it very much. The SSD can be changed, but the RAM and core parts are soldered to the board. Performance is mostly good for 1080p gaming, but certain games can go up to 1440p with minimal changes to the settings.
Some games might need help because this is a special configuration. It's not like a completely optimized commercial console or PC; you have to mess with it every now and again.
Final Thoughts
It might sound strange to play games on a crypto mining board, but the results are surprisingly good. The BC250 is a cheap way to get into desktop PC gaming, especially for people who are okay with making small changes to the setup.
There are certain limits on upgrades, but the overall affordability and performance make it an interesting choice for gamers on a budget who want to play their Steam games on a big screen.
Senior Editor, NoobFeed
Gaming Hardware Updates
No Data.